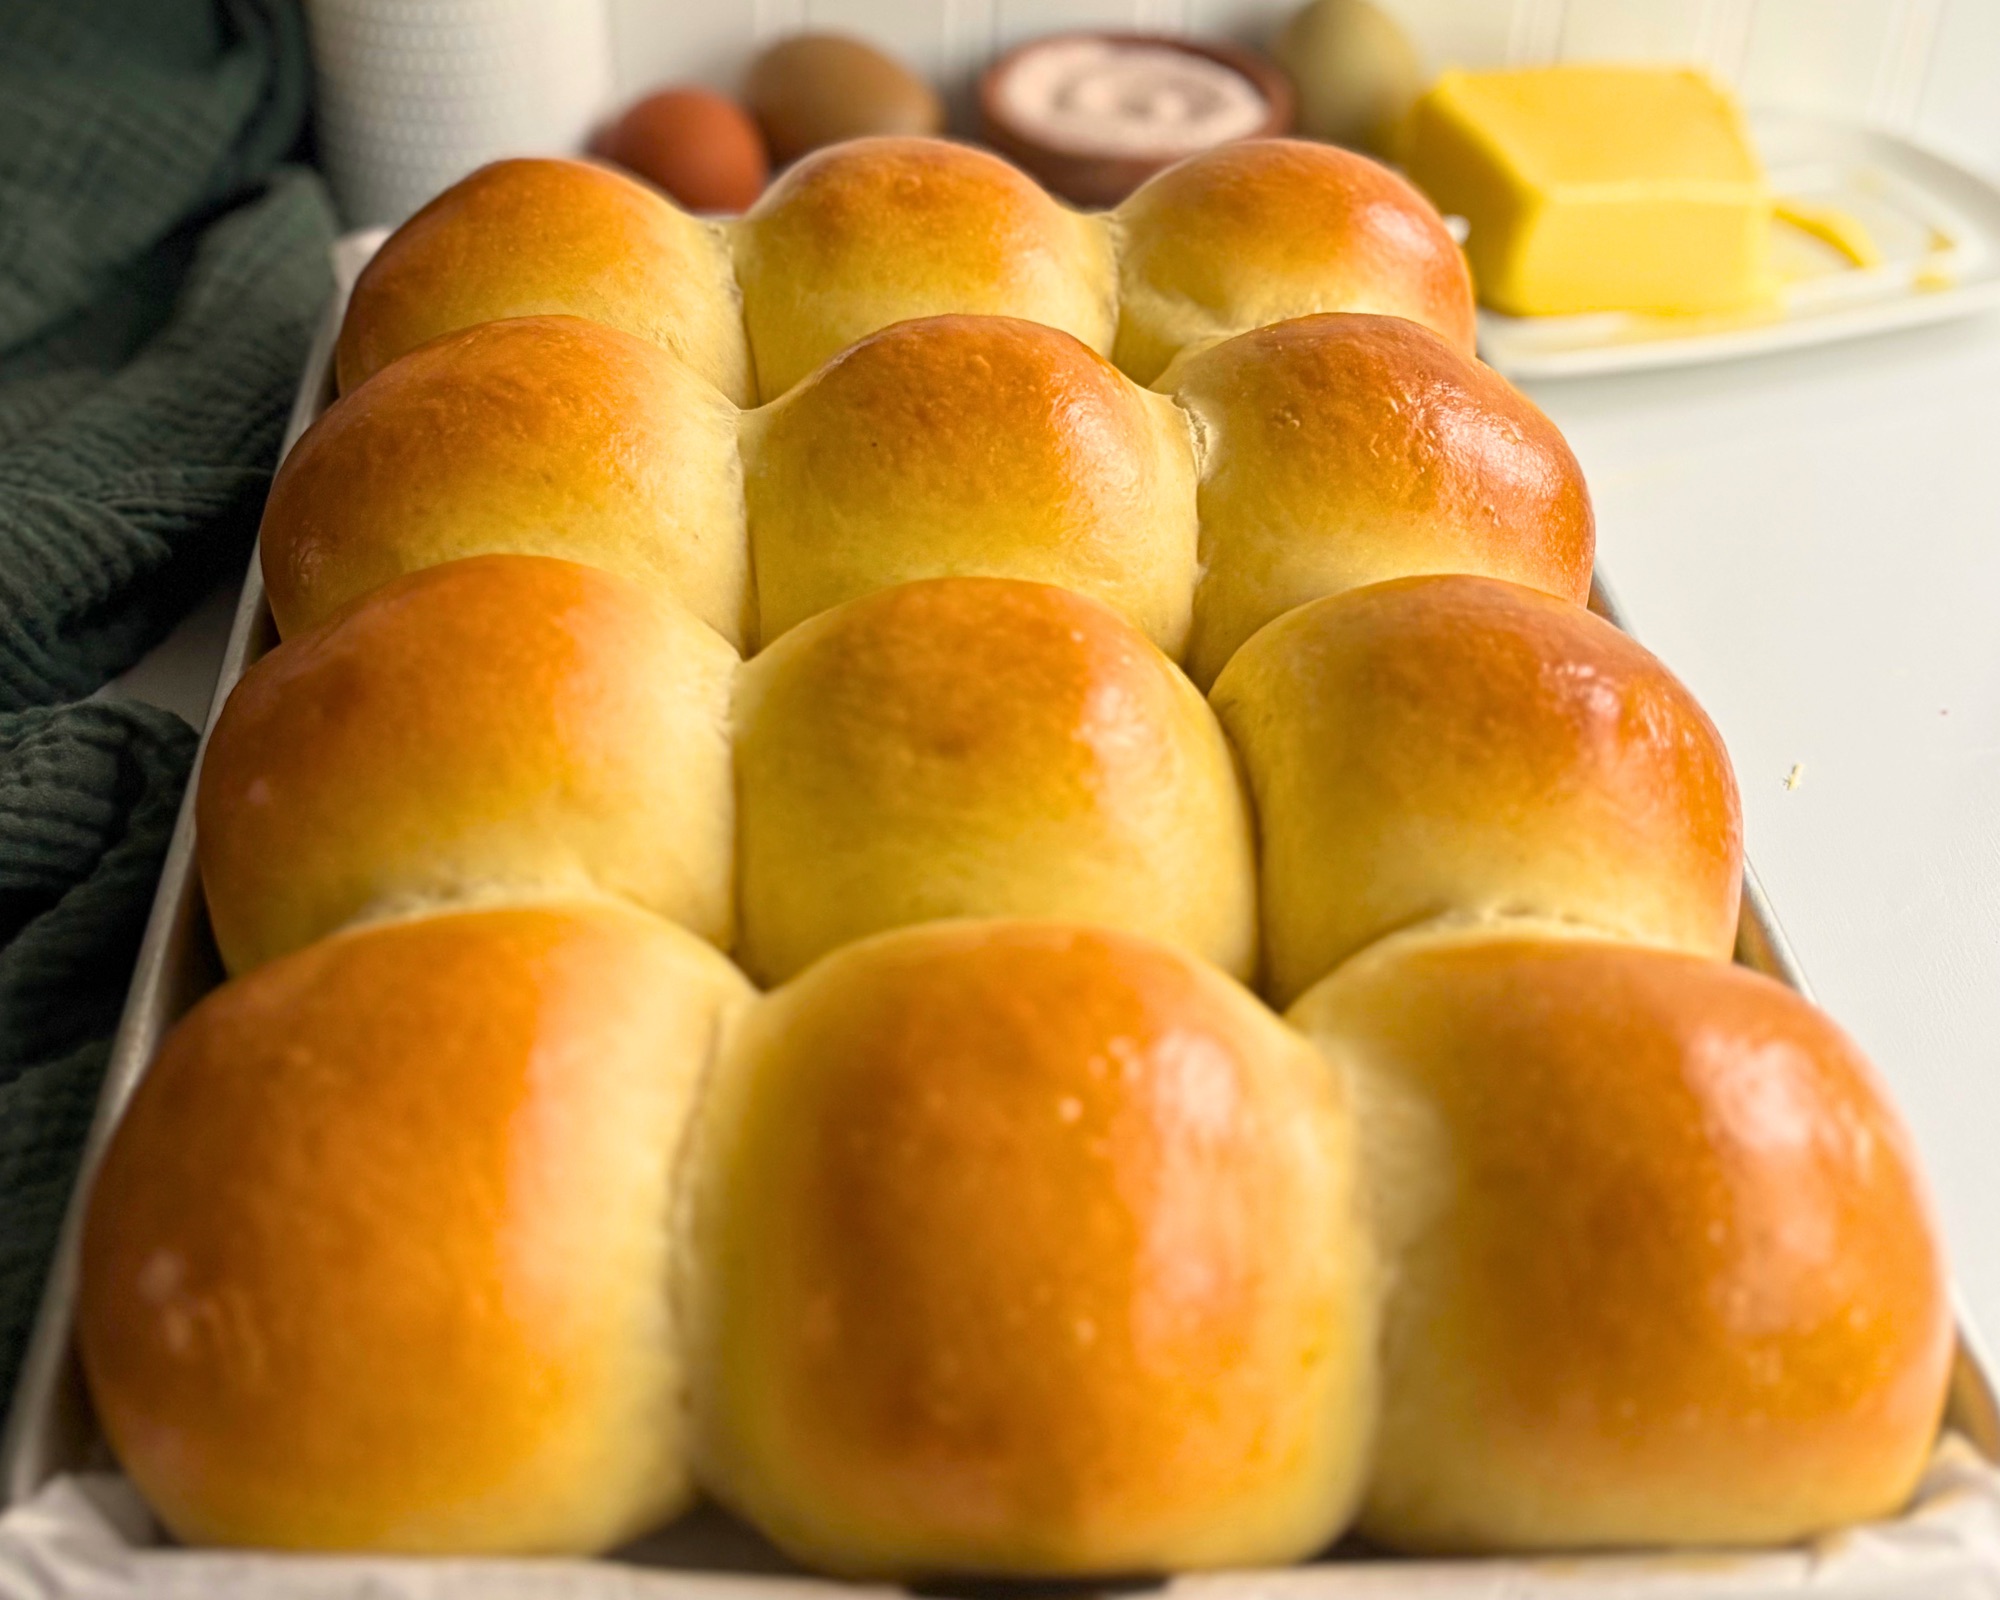
These soft buttermilk dinner rolls are the ones I make when I want a basket of warm, buttery rolls on the table the same day, without a sourdough starter and without an overnight wait. They bake close together on a single quarter sheet pan, so they pull apart with soft, tender sides, and an egg wash before they go into the oven gives them those deep golden, glossy tops that make a holiday table look finished.
I already had a sourdough version of this dough, my Buttermilk Sourdough Rolls, but not everyone keeps a starter on the counter, so I wanted a version anyone could make with a packet of yeast from the grocery store, tested and photographed as its own recipe. It keeps everything people love about the original, the buttermilk, the butter, and the soft, fluffy crumb, and it goes from mixing bowl to dinner table in under four hours, or even faster if your oven has a proof setting.
The recipe makes 14 large dinner rolls, and if you would rather have smaller rolls or burger buns, the roll size section below shows you exactly how to divide the dough, so it works just as well for a busy weeknight as it does for Thanksgiving dinner.
Table of Contents
- Why You Will Love These Buttermilk Dinner Rolls
- What I Learned Testing These Rolls
- Ingredients and What Each One Does
- Shop This Recipe
- How to Make Buttermilk Dinner Rolls
- How Big to Shape the Rolls
- Using Your Oven Proof Setting
- How to Get Golden, Glossy Tops
- Same Day Baking Schedule
- Expert Tips for Soft Dinner Rolls
- Troubleshooting
- Storing, Freezing, and Reheating
- Variations to Try
- What to Serve with These Rolls
- Buttermilk Dinner Rolls Recipe
- Sourdough Version
- Frequently Asked Questions
- More Recipes You Will Love
- Subscribe for Free
Why You Will Love These Buttermilk Dinner Rolls
These rolls check every box I want in a dinner roll, and they do it on a schedule that fits a normal day.

- Soft, pillowy texture, thanks to the buttermilk, eggs, and butter that enrich the dough and keep the crumb tender for days.
- Deep golden, glossy tops from a simple egg wash, finished with melted butter the moment they come out of the oven.
- Made the same day, with no starter to feed and no overnight rise, so you can decide on rolls in the morning and serve them for dinner.
- Your choice of size, with 14 large rolls as written or more, smaller rolls using the size guide in this post.
- Pull apart sides, because the rolls bake touching each other, which keeps the sides soft and the rolls tall.
- Works with active dry or instant yeast, so whatever is in your pantry will do the job.
Back to Table of Contents | Jump to Recipe
What I Learned Testing These Rolls
The biggest question I had going into testing was how to handle the buttermilk, because so many yeasted roll recipes ask you to heat it, and buttermilk curdles easily when it gets warm. I ended up blooming the active dry yeast in a few tablespoons of warm water instead, which let me see that the yeast was alive and foamy before anything else went into the bowl, while the buttermilk only had to come to room temperature. When I pulled my buttermilk straight from the fridge, setting the measured amount in a bowl of warm water for about ten minutes took the chill off without any curdling at all.

I made these rolls both ways, letting the dough rise on the counter and using the 100°F proof setting on my oven. On the counter, the first rise took about an hour and a half, and with the proof setting it was ready in about 45 minutes, which is a real time saver on a busy day. The final proof took between 45 minutes and an hour either way.
The dough makes 14 large rolls at about 75g each. I baked 12 of them together on a quarter sheet pan in four rows of three and tucked the last two into a small pan, and since 75g makes a generous roll, I added a size guide so you can shape them smaller if you prefer. I kept the recipe at two whole eggs and one full packet of yeast so there is nothing to weigh out or save for later. I also bumped the sugar up a little from my original version, which helps the tops brown, and I let them bake a few extra minutes past done, to about 23 minutes, because I wanted that deep golden color. They were fully baked in the center a little earlier, so the extra time is purely for the color.
Back to Table of Contents | Jump to Recipe
Ingredients and What Each One Does
Every ingredient here has a job, and knowing what each one does makes it easier to get great rolls the first time. The exact amounts are in the recipe card below.

Active dry yeast does all the rising. Blooming it in warm water first shows you it is active and gets it working before the dough is mixed. If you have instant yeast instead, the FAQ explains how to use it.
Warm water is only a few tablespoons, just enough to bloom the yeast, and it means you never have to heat the buttermilk.
Buttermilk gives these rolls their soft, tender crumb and a rich, rounded flavor. It should be at room temperature so it does not chill the dough and slow the rise.
Eggs add richness, structure, and that warm golden color inside. Two large eggs go into the dough whole, and a third egg is whisked with a little water for the egg wash.
Sugar rounds out the flavor and helps the tops brown deeply, while keeping these firmly in dinner roll territory rather than sweet roll territory.
All purpose flour keeps the rolls light and soft rather than chewy.
Salt brings out the flavor and keeps the yeast working at a steady pace, so do not skip it.
Unsalted butter goes in softened with everything else, and more butter gets brushed on after baking for a soft, buttery finish.
Flaky sea salt is optional, but a pinch over the egg wash gives each roll a little crunch and a savory finish that goes beautifully with the butter.
Back to Table of Contents | Jump to Recipe
Shop This Recipe
These are the tools I use for these rolls, and a few of them make a big difference in how evenly they turn out.

- Stand mixer with a dough hook, which handles the long knead this enriched dough needs.
- Digital kitchen scale, for weighing the flour accurately and portioning the dough into even rolls.
- Instant read thermometer, for checking the water temperature before blooming the yeast and for knowing exactly when the rolls are baked through.
- Bench scraper, for dividing the dough cleanly.
- Quarter sheet pan, which holds 12 large rolls snugly so they bake into each other, or a half sheet pan if you are baking all 14 or the smaller sizes.
- Parchment paper, so the rolls lift out of the pan in one piece.
- Pastry brush, for the egg wash and the melted butter, although a folded paper towel works just as well for the egg wash.
As an affiliate, I earn a small commission from qualifying purchases made through these links at no extra cost to you, which helps support the blog and keeps the recipes coming.
How to Make Buttermilk Dinner Rolls
The full instructions, amounts, and times are in the recipe card, so this section walks you through what to look for at each stage and why it matters.

Blooming the yeast. Stir the yeast and a pinch of sugar into warm water between 105 and 110°F and give it 5 to 10 minutes. You are looking for a creamy, foamy layer on top, which tells you the yeast is alive and ready to go. If nothing happens, the yeast is likely old, and it is much better to find that out now than after you have mixed the whole dough.
Mixing and kneading. Everything goes into the mixer bowl together, and the long knead is what builds the strength these rolls need to rise tall and hold their shape. Enriched doughs take longer to come together than lean bread doughs, so give it the full time. The dough is ready when it is smooth, elastic, and pulling away from the sides of the bowl.
The first rise. Cover the bowl and let the dough rise until it has roughly doubled. A gentle poke with a floured finger should leave a dent that springs back slowly. In my kitchen this took about an hour and a half on the counter, or about 45 minutes with the oven proof setting.

Dividing and shaping. Weigh the dough into 14 pieces of about 75g each, or use the roll size guide below for smaller rolls, so every roll bakes at the same pace. Shape each one into a tight ball by folding the edges to the center, flipping it seam side down, and rolling it in small circles under your cupped hand on a bare counter. That bit of friction from the counter tightens the surface, which is what gives you round, tall rolls.

The final proof. Arrange the rolls on a parchment lined pan with a little space between them. Twelve large rolls fit a quarter sheet pan in four rows of three, with the last two in a small pan alongside. As they proof, they grow into each other, and they are ready when they look puffy, are touching, and spring back slowly when you poke them.
Baking. Egg wash the tops gently, add a pinch of flaky salt if you like, and bake until the tops are a deep golden brown and the center roll reads about 190°F on an instant read thermometer.
Back to Table of Contents | Jump to Recipe
How Big to Shape the Rolls
The recipe makes about 1051g of dough, and how you divide it decides how many rolls you get and how big they are. I bake mine as 14 large rolls, which are generous and perfect for a holiday table, but smaller rolls are just as soft and stretch the batch further.
- 14 large dinner rolls (about 75g each): This is how I make them. Twelve fit a quarter sheet pan in four rows of three, and the last two can go in a small pan alongside, or you can bake all 14 together on a half sheet pan.
- 18 medium dinner rolls (about 58g each): A classic dinner roll size, baked on a half sheet pan in six rows of three.
- 20 small dinner rolls (about 52g each): Great for a big crowd or a buffet, baked on a half sheet pan in five rows of four.
- 9 burger buns (about 117g each): Flatten each shaped bun slightly with your palm and space them apart on a half sheet pan.
I tested these rolls at the large size, so if you shape them smaller, start checking the bake about 5 minutes early and go by deep golden tops and about 190°F in the center roll. Smaller rolls also tend to proof a little faster, so keep an eye on them during the final rise.
Back to Table of Contents | Jump to Recipe
Using Your Oven Proof Setting
If your oven has a proof setting, it is a great way to speed up the first rise, especially in a cool kitchen in the fall and winter.
Mine runs at 100°F, and the first rise was ready in about 45 minutes instead of an hour and a half on the counter. Keep the bowl covered so the dough does not dry out and form a skin, and start checking early, because a warm rise moves quickly and an overproofed dough can collapse in the oven.
The most important thing to remember is to take the rolls out of the oven before you preheat it. Most ovens cannot proof and preheat at the same time, so pull the pan out, let the rolls finish proofing on the counter while the oven heats to 375°F, and then bake.
Back to Table of Contents | Jump to Recipe
How to Get Golden, Glossy Tops
The deep golden color on these rolls comes from three small things working together, and none of them takes more than a minute.

The first is an egg wash brushed on right before baking, made from one egg whisked with a teaspoon of water. I like to dab it on with a folded piece of paper towel instead of a brush, because it lays down a thin, even coat without deflating the soft, proofed rolls.
The second is a little sugar in the dough, which helps the crust brown as it bakes. The third is patience in the oven. These rolls are baked through before they reach their deepest color, so I let them go to about 23 minutes for a rich golden top.
As soon as they come out of the oven, brush them with melted butter. The butter soaks into the warm crust and keeps the tops soft while adding a beautiful shine.

Back to Table of Contents | Jump to Recipe
Same Day Baking Schedule
These rolls take about three and a half hours from start to finish, and most of that time is hands off. Here is how I plan the day when I want them warm for a 5:00 dinner.
- 1:00 PM Bloom the yeast, then mix and knead the dough.
- 1:30 PM to 3:00 PM First rise on the counter, or about 45 minutes with the oven proof setting.
- 3:00 PM Divide and shape the rolls.
- 3:00 PM to 4:00 PM Final proof.
- 3:45 PM Preheat the oven to 375°F.
- 4:00 PM Egg wash and bake.
- 4:25 PM Brush with butter and let them rest before serving.
For Thanksgiving, I like to start the dough around midday and bake the rolls while the turkey rests, so they come to the table warm without taking up oven space all day.
Expert Tips for Soft Dinner Rolls
These are the small details that make the biggest difference with this dough.

- Check your water temperature. Water between 105 and 110°F wakes up active dry yeast, while much hotter water can kill it.
- Bring your buttermilk to room temperature. Cold buttermilk chills the dough and slows the rise, and a warm water bath takes the chill off without curdling it.
- Do not add extra flour to sticky dough. Enriched dough is tacky by nature, and extra flour makes for tight, dry rolls.
- Knead fully. A smooth, elastic dough is what gives you tall rolls with a soft, feathery crumb.
- Weigh the dough pieces. Even rolls bake evenly, so weigh every piece to the size you chose.
- Watch the dough, not the clock. Your kitchen temperature controls the timeline more than anything written in a recipe.
- Use a thermometer for doneness. About 190°F in the center roll means they are baked through, so any extra time is just for color.
Back to Table of Contents | Jump to Recipe
Troubleshooting
If something did not turn out the way you hoped, one of these is usually the reason.
My yeast did not foam. The yeast is likely old, or the water was too hot or too cold. Start again with fresh yeast and water between 105 and 110°F.
My dough is rising very slowly. Cold buttermilk, cold eggs, or a cool kitchen will all slow the rise. Move the bowl somewhere warmer or use your oven proof setting, and give it more time.
My rolls spread instead of rising tall. They may have been shaped too loosely or proofed too long. Tight shaping and catching the final proof when they spring back slowly will fix it.
My rolls are pale on top. Make sure you used the egg wash, and give them a few more minutes in the oven, since they are baked through before they reach their deepest color.
My rolls are dense. A short knead, old yeast, or cutting the rises short are the usual causes.
Back to Table of Contents | Jump to Recipe
Storing, Freezing, and Reheating
These rolls are best the day they are baked, but they keep well and reheat beautifully.
Room temperature: Store cooled rolls in an airtight container or bag for up to 3 days.
Freezer: Freeze cooled rolls in a freezer bag for up to 3 months. Let them thaw at room temperature, or wrap frozen rolls in foil and warm them at 350°F for 10 to 15 minutes.
Reheating day old rolls: Wrap a roll in a damp paper towel and microwave it for 10 to 15 seconds, or wrap a few in foil and warm them at 300°F for 5 to 7 minutes.
If you want to get ahead for a holiday, bake a batch a few days early, freeze it, and warm the rolls in foil while dinner finishes.
Back to Table of Contents | Jump to Recipe
Variations to Try
Once you have made the classic version, this dough is easy to dress up.
- Garlic herb rolls: Brush the baked rolls with melted butter mixed with minced garlic and chopped fresh parsley or chives.
- Honey butter rolls: Stir a spoonful of honey into the melted butter before brushing it over the hot rolls.
- Everything bagel rolls: Sprinkle everything bagel seasoning over the egg wash in place of the flaky salt.
- Cheese rolls: Sprinkle shredded cheddar or grated parmesan over the egg wash before baking.
Back to Table of Contents | Jump to Recipe
What to Serve with These Rolls
These rolls belong next to anything with a gravy, sauce, or broth worth soaking up. They are a natural fit for a holiday turkey or ham, and they are just as good on a weeknight alongside my Brined Roast Chicken or a bowl of soup made with my Homemade Chicken Bone Broth. Leftover rolls make wonderful little sandwiches with turkey and cranberry the day after Thanksgiving.

Back to Table of Contents | Jump to Recipe
Buttermilk Dinner Rolls Recipe

Soft Buttermilk Dinner Rolls
Equipment
- – Stand mixer with dough hook
- Digital Kitchen Scale
- Instant read thermometer
- bench scraper
- Quarter sheet pan or half sheet pan
- Parchment paper
- Pastry brush or paper towel
Ingredients
Yeast Bloom
- 50 g warm water 105 to 110°F, for blooming the yeast (3 tbsp plus 1 tsp)
- 7 g active dry yeast 2¼ tsp, 1 packet
- Pinch of the granulated sugar for blooming the yeast
Dough
- 228 g buttermilk room temperature (¾ cup plus 3 tbsp)
- 30 g granulated sugar minus the pinch used for blooming (2 tbsp plus 1¼ tsp)
- 2 large eggs room temperature (about 95g)
- 582 g all purpose flour 4¾ cups plus 1½ tbsp
- 10 g fine salt 1¾ tsp
- 50 g unsalted butter softened (3½ tbsp)
For Finishing
- 1 large egg whisked with 1 tsp water for the egg wash
- Flaky sea salt for sprinkling over the egg wash (optional)
- 28 g melted butter for brushing the baked rolls (2 tbsp)
Instructions
- Set the eggs and butter out on the counter to take the chill off. If your buttermilk is cold, set the measured buttermilk in a bowl of warm water for about 10 minutes until it reaches room temperature.
- Stir the active dry yeast and a pinch of the sugar into the warm water and let it sit for 5 to 10 minutes, until foamy. If it does not foam, your yeast may be old, so start over with fresh yeast.
- Add the yeast mixture, buttermilk, remaining sugar, 2 eggs, flour, salt, and softened butter to the bowl of a stand mixer fitted with the dough hook.
- Mix on low until no dry flour remains, then knead on medium for 8 to 10 minutes, until the dough is smooth, elastic, and pulling away from the sides of the bowl. By hand, knead for 12 to 15 minutes.
- Cover the bowl and let the dough rise until roughly doubled, about 1½ hours at room temperature, or about 45 minutes in an oven set to its 100°F proof setting.
- Turn the dough out onto an unfloured counter and divide it into 14 pieces of about 75g each, or see the notes for smaller sizes.
- Shape each piece into a tight ball by folding the edges into the center, flipping it seam side down, and rolling it in small circles under a cupped hand to build surface tension.
- Line a quarter sheet pan with parchment and arrange 12 rolls in 4 rows of 3, leaving a little space between them so they rise into each other. Bake the last 2 in a small parchment lined pan, or bake all 14 together on a half sheet pan.
- Cover loosely and proof for 45 minutes to 1 hour, until puffy and touching, and a gentle poke springs back slowly. If you proof in the oven, take the pan out before preheating.
- Preheat the oven to 375°F (190°C).
- Whisk the egg with 1 tsp water and gently dab it over the tops of the rolls. Sprinkle with flaky sea salt, if using.
- Bake for 20 to 23 minutes, until deep golden brown and an instant read thermometer in the center roll reads about 190°F.
- Brush the hot rolls with melted butter right away and let them cool for about 10 minutes before serving.
Notes
Sourdough Version
If you keep a sourdough starter, these rolls have a sourdough sister. My Buttermilk Sourdough Rolls use the same buttermilk and butter, rise slowly with an active starter instead of yeast, and can be shaped the night before and baked fresh the next day, which makes them perfect for planning ahead.
If you would like to start baking with sourdough, my Minimal Waste Sourdough Starter guide walks you through building a starter from scratch.
Frequently Asked Questions
Here are the questions I get most about these rolls.

Can I use instant yeast instead of active dry yeast?
Yes, use the same amount of instant yeast and add it straight to the mixer bowl with the water, buttermilk, and everything else, with no need to bloom it first. Instant yeast tends to rise a little faster, so start checking the dough early.
Do I need to warm the buttermilk?
You only need to bring it to room temperature so it does not chill the dough. The easiest way is to measure it out and let it sit on the counter for 30 to 60 minutes, or set it in a bowl of warm water for about 10 minutes if you are short on time.
Is it okay if my buttermilk curdles when I warm it?
Yes, a little curdling or separating is completely normal when buttermilk is warmed, and it will not hurt your rolls, since it all gets mixed and kneaded into the dough. Curdling is a sign it warmed up a little too fast, so a gentler warm water bath will keep it smooth next time.
Can I use my oven proof setting?
Yes, and it speeds up the first rise a lot. On my oven’s 100°F proof setting, the first rise took about 45 minutes instead of an hour and a half. Keep the dough covered, check it early, and take the rolls out before you preheat the oven.
What can I use instead of buttermilk?
You can stir 1 tablespoon of lemon juice or white vinegar into enough milk to make 1 cup, let it sit for 5 to 10 minutes, and then weigh out what the recipe calls for. Plain yogurt thinned with milk to a pourable consistency also works.
Can I use bread flour instead of all purpose flour?
Yes, and since bread flour has more protein, the rolls will be a little chewier and may rise a bit taller. The dough may also feel slightly stiffer, so add a splash more buttermilk if it seems dry.
How do I know when the rolls are done?
Look for deep golden tops, and check the center roll with an instant read thermometer, which should read about 190°F. The rolls are baked through before they reach their deepest color, so you can pull them a little early for a lighter top or let them go longer for a richer golden finish.
Can I make these rolls ahead for Thanksgiving?
The easiest way to get ahead is to bake them a day or two early, or even freeze them, and then warm them wrapped in foil at 350°F while dinner finishes. If you would rather shape them the night before and bake them fresh, my sourdough version is built for an overnight rise in the fridge.
Can I bake these in a 9×13 pan?
A 9×13 pan is very close in size to a quarter sheet pan, so 12 large rolls in four rows of three should fit the same way, with the last two baked in a small pan alongside.
Can I double this recipe?
Yes, the recipe doubles well to make 28 large rolls across two half sheet pans. If your mixer is on the smaller side, mix it in two batches so the dough kneads properly.
More Recipes You Will Love
If these rolls are a hit at your table, here are a few more yeasted recipes from my kitchen to try next.

- High Protein Hamburger Buns with Greek Yogurt (Yeasted, Same Day)
- High Protein English Muffins
- High Protein Bagels
- High Protein Caramel Apple Cinnamon Rolls
- Brined Roast Chicken
- Homemade Chicken Bone Broth
Back to Table of Contents | Jump to Recipe
Subscribe for Free
If you want more from scratch bread, sourdough, and high protein recipes like these delivered straight to your inbox, join the H3art of the Home email list. It is completely free, and you will be the first to know when new recipes go live, so you never have to rely on an algorithm to find them.


Leave a Reply