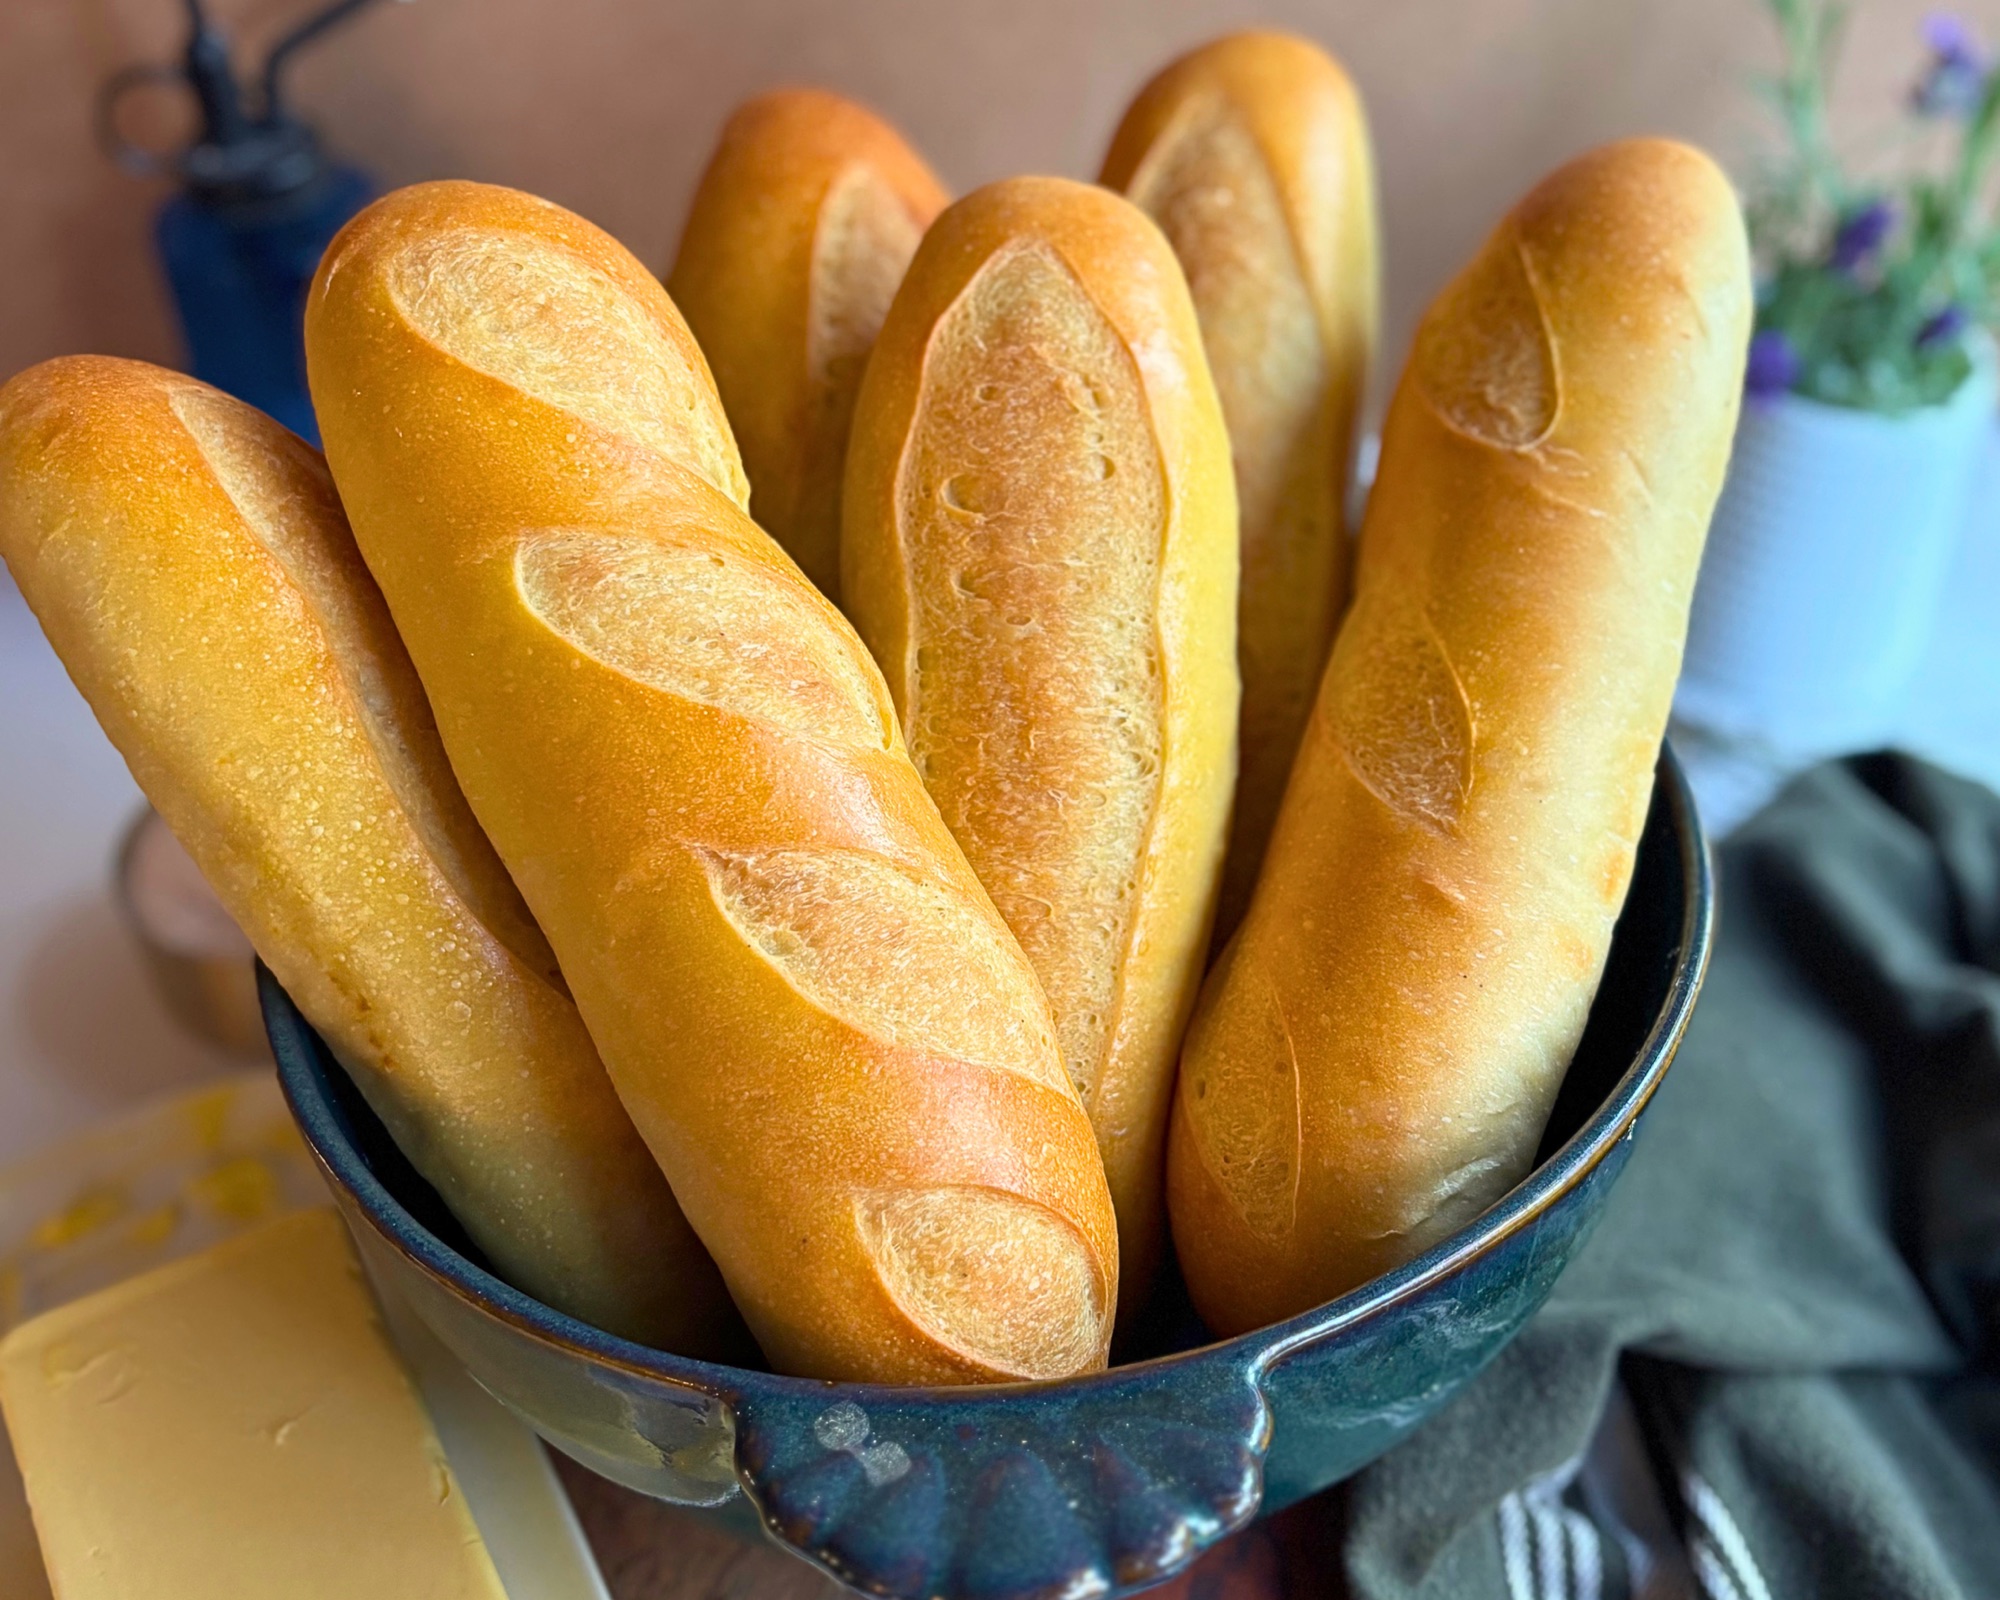
I went looking for a hoagie roll that could handle a real sandwich and brought more to the table. Not a dinner roll stretched long, not a baguette pretending to be a sub, and not something so soft it folded in half the second I put anything wet on it. I wanted a roll with enough body to hold a cheesesteak, enough chew to feel like bread, and enough protein that gave me a little extra boost.
What I had already was my High Protein Sourdough Hamburger Bun dough, which has been one of the most made recipes on this site, and it turns out the distance between a burger bun and a hoagie roll is much shorter than you would think. The dough needed less butter and less sugar, and the shaping needed a complete rethink, but the bones were already there. Nonfat Greek yogurt does the heavy lifting on the protein, the long ferment does the flavor, and the result is a soft bakery style sub roll carrying about 20.8 grams of protein each.
These are a real fermented sourdough rather than a baking powder shortcut, and the protein comes from nonfat Greek yogurt rather than a scoop of powder.

Table of Contents
- Why You Will Love These Rolls
- What Makes These High Protein
- Ingredients You Will Need
- Mixing and the Bulk Ferment
- Hoagie, Sub, Hero, or Grinder
- Soft Roll or Crusty Roll
- How to Shape a Hoagie Roll
- My Hoagie Pan Hack
- How Big Should You Make Them
- How to Score Hoagie Rolls
- Tips for the Best Hoagie Rolls
- Substitutions
- How to Store and Freeze
- What to Put on Them
- Want a Yeast Version
- Shop This Recipe
- More High Protein Recipes
- Frequently Asked Questions
- Recipe
- Subscribe
Why You Will Love These Rolls
- About 20.8 grams of protein per roll, which is more than double what a typical store bought hoagie roll carries
- No protein powder and no chalky aftertaste, since the protein comes from real food you already have in the fridge
- Nonfat Greek yogurt is the hero here, adding protein and moisture at the same time while keeping the crumb tender
- Sturdy enough to hold a hot loaded sandwich without collapsing, which is the whole reason this recipe exists
- One batch makes six full size rolls, and they freeze beautifully
- The dough is genuinely pleasant to work with, which is not something you can say about every enriched sourdough

What Makes These High Protein
Nonfat Greek yogurt is the ingredient doing the work, and the mechanism is simpler than people expect. Almost every hoagie roll recipe hydrates its dough with milk or water, both of which contribute nothing nutritionally. Swapping in Greek yogurt means every gram of liquid in the dough is also carrying protein, and because the water in yogurt is bound up in the solids it behaves more like a thick enrichment than a straight liquid, which is also what gives these rolls their soft, tender crumb.

That is the whole trick, and it is why there is no powder anywhere in this recipe and no chalky aftertaste to work around. The other thing worth knowing is that the protein number is not fixed. It moves with how you divide the dough, which is why the recipe card gives you the numbers for every size. Six big rolls land at about 20.8 grams each, and smaller divides bring that down proportionally, so you can build the roll around the sandwich you want rather than the other way around.
Ingredients You Will Need
Full amounts are in the recipe card at the bottom of the post. Here is what each one is actually doing.
- Bread flour. Do not swap this for all purpose if you can help it. The extra strength is what lets the roll hold a long shape and stand up to a wet filling.
- Active sourdough starter. This needs to be fed and peaked, not discard. If you do not have one yet, my Minimal Waste Sourdough Starter guide walks you through building one from scratch.
- Nonfat Greek yogurt. Warm it for about 30 seconds before it goes in. Cold yogurt straight from the fridge will stretch your bulk ferment out by hours.
- Butter. There is less here than in my burger buns on purpose. Fat tenderizes, and too much of it gives you a roll that compresses into paste under a sandwich.
- Sugar. Also reduced, because a hoagie roll should read savory. What is left feeds the ferment and helps the crust brown.
- Eggs. Two whole eggs for structure and richness, which is part of what lets these hold their shape through a long bake.
- Baking powder. A small insurance policy alongside the starter, which is something I use across the high protein line.
- Egg yolk and heavy cream for the wash. Yolk and cream rather than a whole egg thinned with water, and that swap matters more than it sounds like it should. Egg white gives you shine without much color, so a whole egg wash on a lower sugar dough bakes up pale. The yolk brings the fat and protein that actually drive the browning.
Mixing and the Bulk Ferment
Two moments in this dough decide how the rolls come out, and neither one is in the timing. The first is the 30 minute rest right after the initial mix, which people skip because the dough looks like a disaster at that stage. It is supposed to. Greek yogurt holds most of its water bound up in the solids, so the flour needs time to actually pull it in, and a dough that feels impossible at minute one comes together on its own by minute thirty. Adding flour to fix the stickiness before that rest is the single most common way this recipe goes wrong.

The second is knowing when the bulk ferment is actually finished, and this is where the clock will lie to you. You are looking for roughly a 50 to 75 percent increase rather than a full doubling, and the visual read is more reliable than the number. The dough should look puffed and domed across the top rather than sitting flat, it should move as a single soft mass when you gently shake the bowl, and you should see bubble activity along the edges where it meets the glass. Warm kitchens get there in six hours and cool ones can take nine, so watch the dough.
A note on the poke test, since it comes up constantly. It belongs to the final proof, not to the bulk. A dent pressed into the side of the dough in the bowl will just stay put on an enriched yogurt dough, because it is slack and relaxed rather than over fermented, and reading that as a problem will send you into a rebake you did not need.

Hoagie, Sub, Hero, or Grinder
Same roll, different zip code. I grew up in Pennsylvania so it is a hoagie to me and it always will be, but the sandwich goes by submarine or sub almost everywhere, hero in New York City, grinder in New England, wedge in Westchester, spuckie in Boston, and just Italian in Maine.

None of that changes the bread. If you searched for sub rolls or sandwich rolls and landed here, you are in the right place, and the recipe does not change based on what you call it. Tell me what you call them in the comments, because people are surprisingly passionate about this one.
Soft Roll or Crusty Roll
There are two legitimate hoagie rolls and they are not the same bread. The Philadelphia bakery roll in the Amoroso tradition is a lean dough with a thin crackly crust and a chewy, slightly hollow crumb. The other is a soft bakery sub roll with a tender crumb and a burnished golden crust, which is what most people picture when they think of a sandwich shop roll.

This recipe is the second one, and that is a deliberate choice rather than a compromise. A dough built on Greek yogurt, butter, and eggs will never give you the open, hollow, shattering crust of a lean roll, because the dairy and the fat are permanently in the way of that structure. What it gives you instead is a roll with a tight, even crumb that actually absorbs less liquid from a wet filling, which is a real advantage when there is sauce involved.
If you want to push these toward the crusty side, skip the egg wash and put a small pan on the bottom rack while the oven preheats, then throw in a handful of ice cubes as the rolls go in. Steam keeps the surface of the dough moist through the first few minutes so it can expand before the crust sets, and the result is a thinner, crisper exterior. You will trade away the golden shine for it, so pick one or the other rather than trying to have both.
How to Shape a Hoagie Roll
This is the part that takes the most practice and the part that makes or breaks the finished roll, so it is worth walking through the reasoning rather than just the steps.

The first thing to understand is that a burger bun and a hoagie roll are shaped in opposite directions. A bun is rounded and then pressed flat. A roll is organized along a single long axis and never flattened at all. If you round these into balls and then try to stretch them out, the gluten fights you the whole way and you end up with a fat middle and pinched ends, so the first shaping is a short log rather than a ball.
The rest for 15 to 20 minutes between the first shaping and the final one is the single step people skip and the single step that fixes the most problems. An enriched yogurt dough is extensible and soft, but it still snaps back when you stretch it cold off a tight shaping, and twenty minutes on the counter is what lets it let go.

The second thing to understand is where your length actually comes from. Most people try to roll a finished log longer under their palms, which thins it out and leaves you with something closer to a baguette. Instead, roll the rested log out into a rectangle as wide as you want the finished roll to be, then roll it up from the far edge. The log arrives at length already, and the only thing left to do is even out any thick spots. Seal the seam with every single turn as you roll it up, because a roll that unwinds during the proof will split along its side in the oven instead of opening where you scored it.
Last thing, and it is small but it shows in every photo. Ease off the pressure through the last inch and a half at each end so you finish with blunt ends rather than points. A tapered end has less dough in it, so it bakes faster and dries out, and when you load the sandwich the filling runs out past where the bread narrows.
Watch one roll come together. Roll the rested log out to a rectangle about a half inch thick, as wide as you want the finished roll to be, since your length comes from the rectangle rather than from stretching the log afterward. Roll it up toward you, tucking with your fingertips as you go, which takes about three turns depending on how much dough you are working with. Flip it seam side up, pinch the seam closed along its whole length, then pull each end up and in to blunt it off. Flip it back seam side down and give it one light roll to settle everything before it goes on the pan.
My Hoagie Pan Hack
There is an actual pan for this. Bakeries use a sub sandwich roll pan, sometimes just called a hoagie pan, which is a sheet pan with long indentations pressed into the bottom that cradle each roll and keep it from spreading sideways. The home versions are perforated aluminum trays with three to five troughs.

I do not use one, and I would not tell you to buy one either. Those pans are built for 12 inch rolls, so a 7 1/2 inch roll sits short in the trough with empty space at both ends, and the walls stop supporting the roll exactly where it needs support most. You are also locked into whatever size that pan was made for, which defeats the whole point of being able to size these to the sandwich you are making.
So I build my own out of two things already in the kitchen. Here is how it goes.
- Tear off four or five sheets of aluminum foil and roll each one into a firm rope about as long as your sheet pan is wide, roughly an inch to an inch and a half thick. Squeeze them tight, because a loose rope will flatten under the dough.
- Lay the ropes across the sheet pan with a gap between each one wide enough for a roll plus a little room to spread, which is about 3 inches for a full size roll.
- Lay a single sheet of parchment paper flat over the whole thing. Do not press it down into the gaps, just let it sit.
- Set each shaped roll seam side down into a gap. The weight of the dough settles the parchment into the valley on its own and the foil ropes become the walls.

If you have metal cannoli tubes they work as well as foil. Lay them across the pan in place of the ropes and use the parchment exactly the same way, since they are rigid and hold their shape under the dough instead of flattening the way a foil rope eventually will.
What you get is a roll that rises up instead of out, holds a defined side, and comes off the pan cleanly since the dough never touches the foil. Better than that, you can respace the ropes in about a minute for whatever size you are making that day, which no pan on the market will do.
How Big Should You Make Them
Weight controls how much bread you get, and length controls how thick the roll sits. Once that clicks you can size these however you want without following anyone else’s number.

My batch divides into six pieces at about 200 to 205 grams each, which I preshape to roughly 6 inches and roll out to a 7 or 7 1/2 inch rectangle, finishing at about 7 1/2 inches long. That gives a roll with real girth, which is what a cheesesteak or a loaded Italian needs. The same weight rolled shorter and wider gives you a fatter, stubbier roll, and that works just as well if it suits your sandwich better.
The most accurate way to portion is to weigh the entire dough and divide that number by six rather than counting out a fixed weight, since starter hydration, yogurt brand, and the flour left behind on your counter all shift the total a little from batch to batch. Even pieces matter far more than exact ones, because uneven portions leave you with one roll overbaked and another underdone on the same pan.
If you want smaller rolls, the recipe card lists the divides for seven, eight, and ten pieces along with the protein each one carries, so you can pick the size by the number rather than guessing.
How to Score Hoagie Rolls

Scoring is a look you are choosing, not a rule, and all three of these are correct.
- Three or four short diagonals. My favorite for these, and the most forgiving. Each cut is only about 2 inches long, so there is far less distance for the blade to drag or wander, and you get four chances to get it right instead of one. The repeated cuts give you a rhythm running down the length that photographs beautifully.
- One long slash down the center. Classic, and it gives you a single wide open seam with a pale face down the middle. Start and stop about three quarters of an inch from each end, since the ends are the tightest part of the roll and cutting into them weakens the shape.
- No score at all. Completely legitimate. Plenty of commercial hoagie rolls are unscored, and a dough this soft does not need an escape route the way a lean loaf does. You get a smooth burnished top instead.

Two things that apply no matter which you pick. Hold the blade close to straight up and down rather than angled, because the shallow angled cut that produces a beautiful ear on a lean artisan loaf will skate across a soft egg washed surface and wander off center. And always wash first, then score, never the other way around. Egg brushed into an open cut pools there and sets almost immediately, which seals the score shut before the roll has finished expanding. Let the wash sit about two minutes so it tacks up, then cut.
I used to send the proofed rolls into the refrigerator for fifteen minutes before scoring, on the theory that a firmer skin gives the blade something to bite into. That is true, but once the wash moved ahead of the score the cut was opening cleanly without any help, and what the chill was actually costing me was rise. A cold roll does not spring the way a room temperature one does. Go straight from the final proof to the wash, let it tack, then score and bake.
Tips for the Best Hoagie Rolls
- Warm the Greek yogurt. Thirty seconds in the microwave. Cold yogurt slows the ferment dramatically and is the most common reason a batch takes longer than the recipe says.
- Trust the 30 minute hydration rest. The dough is supposed to feel sticky right after mixing. Cover it and walk away rather than adding flour, and it comes together on its own.
- Do not take the final proof to double. Aim for 50 to 75 percent larger. Anything you give away on the final proof comes straight out of your oven spring, and an over proofed roll will not open at the score no matter how well you cut it.
- Do not chill them before baking. I used to chill these fifteen minutes in the refrigerator before scoring, and I have taken that step out. A cold roll going into the oven does not spring the way a room temperature one does, and side by side the chilled batch came out smaller and less even. Pull the proofing cover for the last fifteen minutes instead, which dries off the condensation that holds back browning without costing you any rise.
- Keep the oven at a steady 375 degrees. A hotter load gives you more spring but sets the crust faster, and a crust that sets early is what stops a score partway open.
- Toast the cut faces. Butter the split faces and griddle them before you build a hot sandwich. Every cheesesteak shop does this, and it is what keeps a soft roll from going limp under the filling.

How to Store and Freeze
Store them in an airtight container at room temperature for up to 3 days, and slice each roll just before you use it rather than cutting them all at once, since an open cut face goes stale fastest.

For longer storage, cool them completely and freeze in a freezer safe bag for up to a month. To bring one back, wrap it in foil and warm it in a 325 degree oven for 8 to 10 minutes, which restores the crust rather than steaming it soft the way a microwave does.
These also work well as a make ahead. Shape the rolls, cover the pans tightly, and refrigerate overnight, then pull them out the next day and let them proof at room temperature for 2 to 3 hours before washing, scoring, and baking. It is the easiest way to have fresh rolls ready for a weekend sandwich night without starting at six in the morning.
Substitutions
Cottage cheese instead of Greek yogurt. Replace the 310 grams of Greek yogurt with 275 grams of thick cottage cheese pureed completely smooth with 35 grams of whole milk, warm the mixture before adding, and let the dough rest a few extra minutes after the initial mix so the flour has time to absorb the moisture.
Full fat Greek yogurt. This works but the protein per roll will drop and the dough may run slightly wetter, so add flour in 10 gram increments if needed.
All purpose flour. This works as a swap by weight but the rolls will be more delicate and the protein per roll will drop. Start with 500 grams and add more only if the dough will not come together.
Salted butter. Reduce the salt in the dough by 2 grams to compensate.
Sesame seed rolls. Sprinkle sesame seeds over the wash before scoring for a classic deli look.
A softer crust. Brush the rolls with melted butter straight out of the oven. It softens the crust and dulls the shine from the egg wash, so it is worth doing only if you want a softer roll rather than one that stands up to a wet filling.
What to Put on Them

- Philly cheesestake. Chopped ribeye, onions, provolone or whiz. Griddle the cut faces first.
- Classic Italian. Capicola, salami, provolone, shredded lettuce, tomato, onion, oil and vinegar, oregano. This is the one the roll was built for.
- Meatball sub. The tight crumb here is a real advantage, since it soaks up less sauce and stays intact longer.
- Chicken cutlet. Breaded cutlet, broccoli rabe or spinach, sharp provolone.
- Roast beef with gravy. Dip the whole thing if that is your preference, and this crumb holds up better than you would expect.
- Breakfast sub. Scrambled eggs, cheese, and sausage or bacon, which pushes an already high protein roll well past thirty grams.
Want a Yeast Version
You do not need a sourdough starter to make these. Everything that matters here is technique rather than leavening, so the shaping, the sizing, the scoring, the wash, and the bake all carry over to commercial yeast exactly as written.
The only real adaptation is the timing and the liquid. Yeast gets you from mix to bake in a few hours instead of a full day, so the long bulk ferment collapses down to a single rise, and removing the starter takes a meaningful amount of both flour and water out of the dough that has to be added back. That is enough of a change that it deserves its own recipe rather than a note at the bottom of this one.
If you want to build a starter instead, my Minimal Waste Sourdough Starter guide will get you there in a couple of weeks with almost nothing thrown away.
Shop This Recipe
These are the tools I actually reach for when I make these. As an Amazon Associate I earn from qualifying purchases at no extra cost to you, which helps support the blog.
- Kitchen scale. Non negotiable for this one, since the whole portioning method depends on weighing the dough and dividing it.
- Stand mixer. The knead on this dough runs 6 to 8 minutes and it is genuinely sticky, so a mixer earns its place here.
- Bench scraper. For pulling the dough off the bowl cleanly and for dividing the portions.
- Rolling pin. Used to roll each rested log into the rectangle that sets your finished length.
- Half sheet pans. Two of them, since six rolls need the space to spread.
- Parchment paper. Keeps the bottoms from taking too much color.
- Bread lame or razor blade. A real blade rather than a knife, which is the difference between a clean score and a dragged one.
- Instant read thermometer. These come out at 190 to 195 degrees, and guessing on a roll this size is how you end up with a gummy center.
- Wire cooling rack. They have to cool completely before slicing.
- Bread flour. The strength here is what lets the roll hold its shape under a filling.
More High Protein Recipes
If these are your speed, start with the buns this dough came from.
- High Protein Sourdough Hamburger Buns (Greek Yogurt, Soft and Fluffy)
- High Protein Sourdough Bagels
- High Protein Sourdough Chocolate Chip Muffins
- The Easiest Apple Cinnamon Swirl Sourdough Bread
- Chocolate Cookie Dough Swirl Sourdough Bread
Frequently Asked Questions

What is the difference between a hoagie roll and a sub roll?
Nothing. They are the same bread, and the name just changes depending on where you grew up. Hoagie is Philadelphia and Western Pennsylvania, sub is the national default, hero is New York City, and grinder is New England.
Can I make these without a sourdough starter?
Yes, with commercial yeast, though the timing and the liquid both have to change enough that it needs its own recipe rather than a swap in this one. There is a full yeast version of these rolls on the blog.
Why is my score not opening in the oven?
The most common cause is egg wash applied after scoring, which pools in the cut and sets almost instantly, sealing it shut. Wash first, let it tack up for a minute or two, then score. If it opens partway and stops, the crust is setting before the roll finishes expanding, so keep the oven at a steady 375 rather than loading into a hotter oven.
Why did my rolls come out smaller than yours?
Two usual causes. Taking the final proof all the way to double spends the gas before the rolls ever reach the oven, and chilling shaped rolls before baking costs oven spring. Proof to 50 to 75 percent larger and go straight from the proof into the oven.
My rolls came out looking like baguettes. What went wrong?
They were rolled too long for their weight. Length controls how thick the roll sits, so the same piece of dough rolled to 7 1/2 inches gives you a proper sandwich roll while the same piece stretched to 9 inches comes out slim. Roll shorter, not lighter.
Can I use all purpose flour?
You can, but the rolls will be noticeably more delicate and the protein per roll drops. Start with 500 grams and only add more if the dough will not come together. Bread flour is what gives these the strength to hold a loaded sandwich.
Do I have to use Greek yogurt?
Cottage cheese works if you blend it completely smooth with a little milk first, and the recipe card has the exact swap. Full fat Greek yogurt also works, though it runs wetter and brings the protein per roll down. See the substitution section.
How do I keep the roll from getting soggy?
Butter the cut faces and griddle them before you build a hot sandwich. This is standard practice at every cheesesteak shop and it is the single most effective thing you can do, since a toasted face resists moisture in a way a raw one cannot.
Can I make these ahead?
Yes. Shape the rolls, cover the pans tightly, and refrigerate overnight, then proof at room temperature for 2 to 3 hours the next day before baking.
Recipe

High Protein Sourdough Hoagie Rolls
Equipment
- – Stand mixer with dough hook
- kitchen scale
- Large mixing bowl
- Whisk
- Rolling Pin
- Two half sheet pans
- Aluminum foil or metal cannoli tubes
- Parchment paper
- Paper towel or pastry brush
- Razor blade or bread lame
- Instant read thermometer
- Wire cooling rack
Ingredients
For the Dough
- 530 grams bread flour 4 1/3 cups
- 215 grams active peaked sourdough starter 1 cup
- 310 grams nonfat Greek yogurt slightly warmed (1 1/4 cups)
- 40 grams unsalted butter softened (2 3/4 tablespoons)
- 20 grams granulated sugar 1 1/2 tablespoons
- 10 grams fine sea salt 1 2/3 teaspoons
- 4 grams baking powder 1 teaspoon
- 2 large eggs room temperature
For the Egg Wash
- 1 large egg yolk
- 10 grams heavy cream or whole milk 2 teaspoons
Instructions
- Warm the Greek yogurt in the microwave for 30 seconds until it is slightly warm to the touch but not hot, because hot yogurt can damage the wild yeast in your starter while cold yogurt will drag the bulk ferment out by hours.
- In the bowl of a stand mixer fitted with the dough hook, combine the sourdough starter, warmed Greek yogurt, eggs, and sugar, and mix on low just to bring everything together.
- In a separate bowl, whisk together the bread flour, baking powder, and salt, then add the dry ingredients on top of the wet mixture. Cut the softened butter into marble sized pieces and add them to the bowl.
- Mix on low speed until a shaggy dough forms and the flour is fully incorporated, about 2 minutes. The dough will feel sticky at this stage, which is exactly what a yogurt based sourdough is supposed to do.
- Cover and let the dough rest for 30 minutes without touching it. This hydration rest is essential, since the yogurt needs time to fully integrate with the flour, and skipping it leaves you with a dough that feels impossible to work with.
- After the rest, mix on low for 1 minute to bring the dough back together, then increase to medium low and knead for 6 to 8 minutes until the dough is smooth, soft, and slightly tacky and pulls away from the sides of the bowl. If it is still clinging to the sides after the full knead, add flour 10 grams at a time until it comes together.
- Use a bench scraper to pull the dough cleanly off the sides of the bowl and gather it into a ball, then place it in a lightly oiled bowl, cover with plastic wrap or a damp towel, and let it rest at room temperature for 1 hour.
- After 1 hour, perform one set of stretch and folds with lightly dampened hands, grabbing one side of the dough, stretching it up, and folding it over the center, rotating the bowl and repeating three more times. Finish with one or two slap and folds to seat the seam underneath and build tension across the top of the dough ball.
- Cover and continue to rise at room temperature for another 6 to 7 hours, until the dough has puffed and domed rather than sitting flat across the top, jiggles as a single soft mass when you gently shake the bowl, and shows bubble activity along the edges where it meets the bowl. You are looking for roughly a 50 to 75 percent increase rather than a full doubling, which is about 6 to 8 hours total from mixing. Warmer kitchens move faster and cooler kitchens take longer, so watch the dough rather than the clock.
- Turn the dough out onto a lightly floured surface and weigh the entire mass, then divide that number by six to get your portion weight, which will land right around 200 to 205 grams per piece. Weighing the whole dough and dividing is more accurate than aiming for a fixed number, since starter hydration, yogurt brand, and flour left behind on the counter all shift the total slightly from batch to batch.
- Preshape each piece into a log about 6 inches long. Press the portion into a small rectangle, fold the top down to the center and press, fold it over on itself once more, and roll it closed. Seal the seam lightly rather than tightly, because the point of the preshape is to organize the dough and leave it something to give at final shaping. See blog post for other shaping options.

- Set the logs seam side down, cover, and rest on the counter for 15 to 20 minutes, keeping them in the order you shaped them so you come back to the first one first. Do not skip this rest, because an enriched yogurt dough that has not relaxed will snap back the moment you try to stretch it long and leave you with a fat middle and skinny ends. Test one by pressing a fingertip into the side, and if the dent holds for a beat and then slowly fills, they are ready. For a shaping video, see the blog post to watch it done in real time.
- Lightly flour the counter and dust your rolling pin, going light on both since heavy flour at this stage leaves dry streaks baked into the surface. Take the first rested log, set it seam side up, and press it down with your fingertips from the center outward, paying attention to the two ends so they flatten as much as the middle does.

- Roll the log into a rectangle roughly 7 to 7 1/2 inches wide and about 5 inches deep, with the long edge running parallel to the counter edge in front of you. Aim for about a third of an inch thick and keep the corners squared rather than rounded, since rounded corners are what give you skinny tapered ends later. Your length comes from how wide you roll this rectangle rather than from stretching the log afterward.
- Starting at the far long edge, fold about an inch of dough down onto itself and press that seam firmly into the sheet below it. Keep rolling toward yourself one turn at a time, pressing each new seam down before you make the next one, and letting your fingertips pull back very slightly so the log stays taut without stretching. When you reach the near edge, pinch the final seam closed along its entire length including right at the two ends.
- Give the log one or two passes under flat palms to even out any thick spots, easing the pressure off through the last inch and a half at either end so you finish with blunt hoagie ends rather than tapered points. The finished roll should measure about 7 1/2 inches. Place it seam side down on the prepared pan and move to the next one.
- Lay firmly rolled ropes of aluminum foil, or metal cannoli tubes wrapped in foil, across a half sheet pan about 3 inches apart, then lay one sheet of parchment flat over the top without pressing it down into the gaps. Set each shaped roll seam side down into a gap, where its own weight will settle the parchment into the valley and the tubes will act as walls that push the rolls up instead of out. See the hoagie pan hack note below or on the blog.

- Space the rolls 2 1/2 to 3 inches apart, since they spread outward more than a burger bun does. Do not press them flat. Cover with a lid or a large plastic bag and proof at room temperature for 1.5 to 2 hours. They are ready when they look visibly puffy and rounded with the sides starting to bulge, and when a fingertip pressed gently into the side leaves a dent that fills back in slowly and only partway. Aim for a 50 to 75 percent increase rather than a full double, since anything you give away on the final proof comes straight out of your oven spring.
- Preheat the oven to 375 degrees Fahrenheit. Pull the proofing cover off for the last 15 minutes so any condensation on the tops has a chance to dry off before the wash goes on, since a damp surface is one of the main things that holds back browning. Do not chill the rolls before baking.
- Whisk the egg yolk and cream together until smooth. Apply the wash first and score second, since egg brushed into an open cut can set and glue the score shut before the roll finishes expanding. Lay the wash on gently with a folded paper towel or a soft pastry brush, using light strokes rather than pressure, and carry it down the shoulders on each side so you do not get a color line where the wash stopped. One thin even coat is all you need, since a heavy coat bakes up blotchy.
- Let the wash sit for about two minutes so it tacks up, then score. Make three or four short diagonal cuts across the width of each roll, each about 2 inches long, angled roughly 45 degrees off the long axis, spaced about an inch and a half apart, and stopping about an inch in from each end. Hold the blade close to straight up and down rather than angled, go about three eighths of an inch deep, and make one confident pass per cut rather than several careful ones. Wipe the blade between rolls so egg residue does not build up on the edge. See the scoring note below for other options.
- Bake uncovered for 26 to 30 minutes, rotating the pans halfway through, until deep golden brown. The internal temperature should read 190 to 195 degrees Fahrenheit on an instant read thermometer, and the thermometer is more reliable here than the clock. Tent loosely with foil if they are getting dark before the center comes up to temperature.
- Cool completely on a wire rack before slicing. A yogurt crumb is still setting for a good twenty minutes out of the oven, and slicing warm will smear it.
Notes
Subscribe
Want recipes like this one first? Subscribe for free and I will send new high protein and sourdough recipes straight to your inbox, along with the notes and troubleshooting that do not always make it into the post. It costs nothing and you can unsubscribe any time.





Leave a Reply