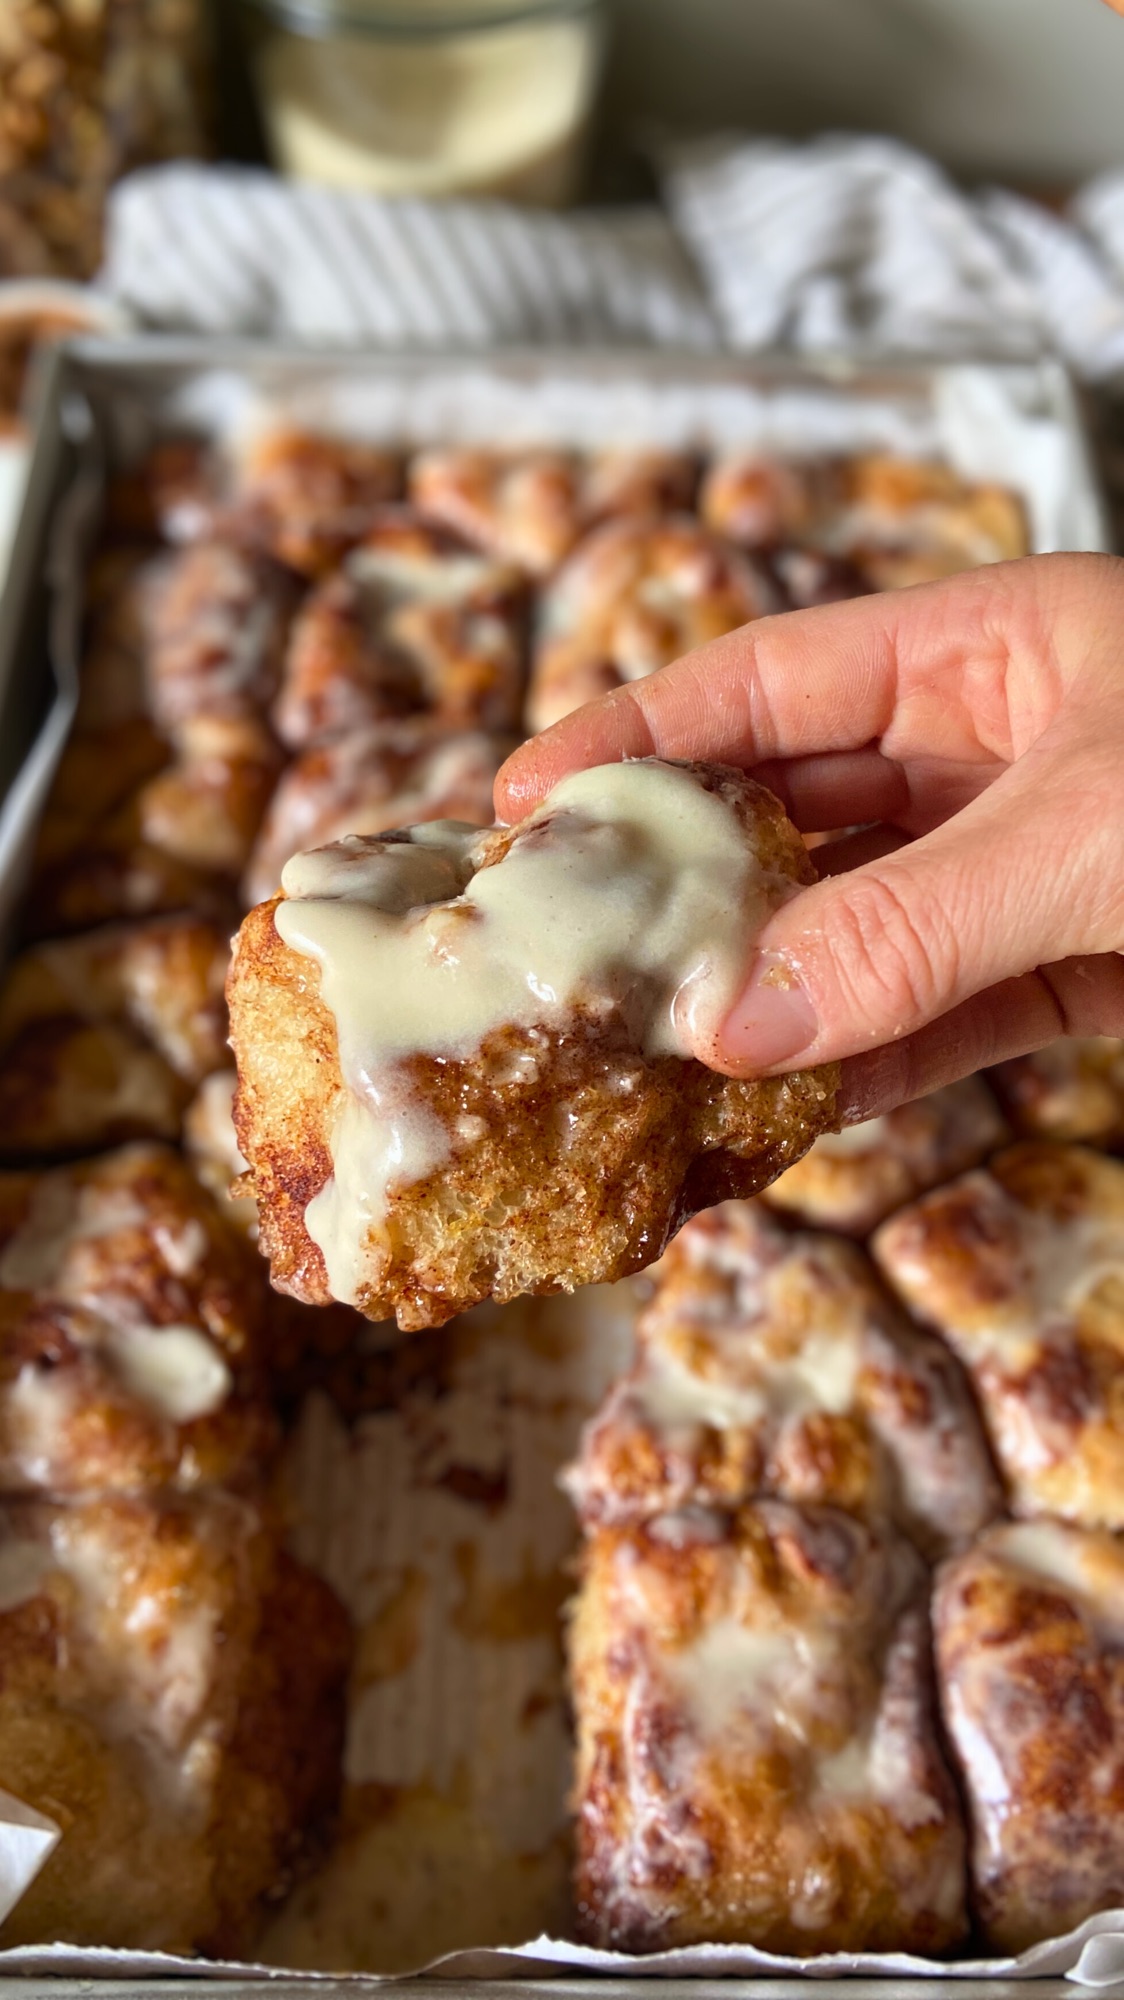
The reels for this recipe have passed 50 million views across social media, and it is the most visited recipe on my entire site. There is a reason it took off. It takes my viral pull-apart sourdough focaccia and turns it into a pan of soft, buttery cinnamon roll pieces that you tear apart with your hands. Each ball is dunked in vanilla butter, rolled in cinnamon sugar, baked until the bottom caramelizes, and finished with a sweet glaze or a rich cream cheese frosting. It tastes like the gooey middle of a cinnamon roll with none of the rolling, cutting, or fuss.
If you have made my Garlic Parmesan Pull-Apart Focaccia, the savory recipe that started this whole series, you already know the method. If you are brand new, do not worry. I walk you through every step, including how to handle the wet dough, and there is a full same day yeast version below for anyone without a sourdough starter.
Table of Contents
- Why You Will Love This Recipe
- What Makes This Cinnamon Roll Focaccia Different
- Ingredient Notes
- How to Make Cinnamon Roll Pull-Apart Focaccia
- Handling the Wet Dough
- The Sourdough Recipe
- The Yeast Recipe
- Tips for the Best Cinnamon Roll Focaccia
- Ingredient Substitutions
- Storage and Make Ahead Instructions
- Frequently Asked Questions
- More Pull-Apart Focaccia Recipes to Love
- Subscribe
Why You Will Love This Recipe
This is the recipe that turned my pull-apart focaccia into a whole series, and it is the one readers come back to again and again. Here is why it works so well.
It tastes exactly like a cinnamon roll, but easier. You skip rolling, filling, and slicing. You shape simple dough balls, dip, coat, and bake.
The pull-apart format is pure fun. Every piece separates cleanly with that soft, fluffy interior and a caramelized cinnamon sugar shell. Readers describe it as a cross between a cinnamon roll and monkey bread.
It fits your schedule. Start it the night before and bake in the morning, or mix in the morning and bake that evening. The dough is forgiving and the timing is flexible.
You get to choose your finish. A quick vanilla glaze keeps it light and classic, or a cream cheese frosting makes it rich and indulgent.
It works with sourdough or yeast. Use an active starter for that slow fermented flavor, or use the same day yeast version and have warm cinnamon focaccia in about five hours.

What Makes This Cinnamon Roll Focaccia Different
Most cinnamon roll focaccia recipes spread the dough flat in a pan, dimple it, and press a cinnamon sugar mixture into the surface. That is delicious, but it bakes up like a sweet slab.
Mine is different on purpose. Instead of one flat sheet, you divide the dough into balls, dunk each one in vanilla butter, and roll it in a brown sugar cinnamon coating before nestling them into the pan. As they rise and bake, the balls grow together into one soft loaf that pulls apart into individual glazed pieces. You get more surface area, more caramelization, and more of that cinnamon roll character in every bite.
That pull-apart shape is the whole point, and it is what made this version go viral in the first place.

Ingredient Notes
Full measurements are in the recipe cards below. Here is what matters most about the key ingredients.
Bread flour gives you the soft, chewy, pillowy structure this dough needs. All purpose flour works in a pinch, but reduce the water slightly since it absorbs less. If you use fresh milled flour, expect your hydration and proofing times to shift, so watch the dough rather than the clock.
Active sourdough starter should be fed, bubbly, and at its peak. That is what gives you a good rise and depth of flavor. No starter? Use the yeast version below.
Butter appears in three places: a little in the dough, a puddle in the pan for a caramelized bottom, and the vanilla butter dip that coats every ball. Salted butter actually tastes best here because the salt balances the sweetness. If you only have unsalted, add a pinch extra to your melted butter.
Brown sugar and cinnamon make the coating. A little cornstarch mixed in helps it cling to the dough and set into that signature crackly shell.
Vanilla shows up in the dough, the butter dip, and the glaze. Do not skip it. It is what makes this taste like a bakery cinnamon roll.
Your topping of choice. The classic vanilla glaze is quick, sweet, and pourable. The cream cheese frosting is richer and more indulgent. Both are in the recipe cards.
How to Make Cinnamon Roll Pull-Apart Focaccia
Here is the process at a glance. The full step by step is in the recipe cards below.
First, you make the dough. Mix your wet ingredients, add the flour, salt, and cinnamon, and stir until no dry flour remains. The dough will be sticky and shaggy, and that is exactly right.
Next, you build strength and ferment. Rest the dough, then do your stretch and folds. For sourdough that is one set that goes around the bowl, then a long slow bulk ferment overnight at room temperature. For yeast, you do three sets of stretch and folds spaced about thirty minutes apart, then a much shorter rise.
Then you shape and coat. Divide the risen dough into balls, dunk each one in vanilla butter, and roll it in the cinnamon sugar. Nestle the coated balls into a buttered pan so they just barely touch.
After that, the balls rise again until they puff up and grow together into one cohesive pull-apart loaf.
Finally, you bake until golden and caramelized, cool slightly, and finish with glaze or cream cheese frosting. Serve warm and pull it apart.

Handling the Wet Dough
This is a high hydration dough, which is exactly what gives you that soft, airy, tender crumb. It is on the sticky side, and if you are not used to working with wet dough it can feel strange at first. That is normal. Here is how to handle it with confidence.
Work with a light touch and a damp or lightly oiled hand. Quick, gentle movements are your friend. When you do your stretch and folds, keep your hand on the top surface of the dough as you lift and fold it over. You do not need to dig your hand all the way in the way you would knead a stiff bread dough. You are not really kneading this dough at all.
Resist the urge to add extra flour. Adding flour changes the texture and firms up the crumb you are working so hard to keep soft. If you are truly nervous about the stickiness, start by reducing the water in the recipe slightly and work your way up on your next bake once you are comfortable.
A light spray of avocado or olive oil on your work surface makes shaping the balls much easier, and oiled hands keep the dough from clinging to you.

The Sourdough Recipe
This is the original, and it is first for a reason. The overnight room temperature fermentation is what gives this bread its beautiful flavor and structure. Use an active, bubbly starter at its peak for the best rise.

Cinnamon Roll Pull-Apart Sourdough Focaccia
Ingredients
For the Sweet Sourdough Dough:
- 500 g bread flour 4 cups
- 400 g water room temperature (1 3/4 cups)
- 75 g active sourdough starter fed and bubbly (1/3 cup)
- 8 g salt 1 1/2 teaspoons
- 30 g sugar 2 tablespoons + 1 teaspoon
- 10 g vanilla extract 2 teaspoons
- 14 g butter melted (1 tablespoon)
- 1-2 g ground cinnamon 1/4 to 1/2 teaspoon
For the Pan:
- 28 g butter melted (2 tablespoons)
For the Vanilla Butter Dip:
- 85 g butter melted (6 tablespoons)
- 5 g vanilla extract 1 teaspoon
For the Cinnamon Sugar Coating:
- 150 g brown sugar packed (3/4 cup)
- 7 g cornstarch 1 Tablespoon
- 12-15 g ground cinnamon 1½ to 2 tablespoons
For the Classic Cinnamon Roll Glaze:
- 180 g powdered sugar 1 1/2 cups
- 45-60 g milk or cream 3 to 4 tablespoons
- 5 g vanilla extract 1 teaspoon
- Pinch of salt
OR For the Buttercream Cheese Frosting (Upgraded Option):
- 113 g unsalted butter softened (1/2 cup / 1 stick)
- 113 g full-fat cream cheese cold (1/2 cup / 4 oz)
- 425 g powdered sugar sifted (3 1/2 cups)
- 15 g buttermilk powder optional (1 tablespoon)
- 2-4 g ground cinnamon (1/2 to 1 teaspoon)
- 5 g vanilla extract or paste 1 teaspoon
- 3 g fine sea salt 1/2 teaspoon
Instructions
Day 1: Make the Sweet Sourdough Dough
- Mix the dough: In a large bowl, combine water, active sourdough starter, sugar, vanilla extract, and melted butter. Mix until combined. Add the flour, salt, and cinnamon, then mix until no dry flour remains. The dough will be sticky and shaggy.
- Rest: Cover the bowl with a damp towel or plastic wrap and let rest for 1 hour at room temperature.
- Stretch and fold: Perform one set of stretch and folds to build strength in the dough. Wet your hands, grab one side of the dough, stretch it up, and fold it over itself. Rotate the bowl 90 degrees and repeat 4-6 times total until you’ve worked around the entire dough ball.
- Bulk fermentation (room temperature proof): Cover the bowl and let the dough proof at room temperature for approximately 8-12 hours, or until at least doubled, even tripled in size and puffy. The exact time will depend on your kitchen temperature and starter strength.
Day 2: Shape, Rise, and Bake
- Prepare your pan: Line a 9×13 inch baking pan with parchment paper. Pour 28g (2 tablespoons) of melted butter into the bottom of the pan and spread it around evenly. This creates a golden, caramelized bottom.
- Prepare vanilla butter: Melt 85g butter and stir in 5g vanilla extract. Set aside in a bowl for dipping.
- Prepare cinnamon sugar: Mix brown sugar, cornstarch and cinnamon in a shallow bowl or plate. This will coat each dough ball.
- Shape into balls: Turn the dough out onto a lightly floured/sprayed with oil, surface. Divide and shape into approximately 16-20 equal-sized balls (or your preferred size). You can use a bench scraper to divide evenly.
- Dip and coat: Dip each ball into the vanilla butter, allowing excess to drip off, then roll generously in the cinnamon sugar mixture. Make sure each piece is well-coated for maximum flavor!
- Arrange in pan: Place the coated dough balls in the prepared pan, spacing them slightly apart. They should just barely touch, they’ll expand and connect during the second rise.
- Drizzle with butter: Pour any remaining vanilla butter over the arranged dough balls. This creates an incredible caramelized bottom layer.
- Second rise: Cover and let rise for 2 hours at room temperature, or until puffy and the balls have grown together into one cohesive pull-apart bread.
- Bake: Preheat oven to 375°F (190°C).
- Dimple the focaccia balls with your fingers
- Bake for 25-30 minutes, or until golden brown on top. The internal temperature should reach about 190-200°F for perfectly baked bread.
- Cool slightly: Let cool in the pan for 10-15 minutes before glazing.
Make the Cinnamon Roll Glaze
- Prepare glaze: While the focaccia cools slightly, whisk together 180g powdered sugar, milk/cream (starting with 45g), 5g vanilla extract, and a pinch of salt until smooth.
- Add more milk if needed to reach a drizzling consistency, you want it thick but pourable.
OR Make the Buttercream Cheese Frosting (Alternative)
- Prepare buttercream cheese frosting:
- Cream 113g softened butter on medium-high speed for 2 minutes until pale and fluffy.
- Add 113g cold cream cheese and beat just until combined, don’t overmix or it will become too soft.
- Mix in 1 tsp vanilla extract and 1/2 tsp fine sea salt.
- Sift together 425g powdered sugar, 1/2-3/4 tsp ground cinnamon, and 1 tbsp buttermilk powder (if using).
- Add the sifted dry ingredients gradually on low speed until fully incorporated and smooth. About 1/4 cup at a time.
- Taste and adjust: add more cinnamon or salt if desired for your perfect flavor balance.
- Frost or glaze: Generously spread the buttercream cheese frosting (or drizzle the glaze) over the warm focaccia. The warmth will help the frosting melt slightly into the layers, creating an irresistible finish.
Serve: Serve warm and pull apart to enjoy! Each piece should separate easily with that signature pull-apart texture.
Notes
Option 1, night before: Evening, mix the dough and proof overnight at room temperature. Morning, shape the balls, dip and arrange, rise 1 to 2 hours, then bake and ice.
Option 2, day before: Morning, mix the dough and proof all day. Evening, shape the balls, dip and arrange, cover well and refrigerate overnight. Next morning, bring to room temperature for 1 to 2 hours, then bake and ice.
Both ways give the same delicious result. Follow the signs of a complete proof, not just the clock. The dough should be soft and slightly sticky. This is what creates the tender, fluffy texture. Spray a little avocado or olive oil on your work surface before you turn out the dough, and use damp or oiled hands. Resist adding extra flour. Do not skimp on the butter dip. It creates amazing caramelization with the cinnamon sugar and keeps the bread moist. Choose your topping. The simple glaze is quick and sweet. The cream cheese frosting is richer and more indulgent. For the frosting, use cold cream cheese so it does not become too soft, and spread it while the focaccia is still warm for that melty finish. For extra indulgence, reserve a small amount of the vanilla butter to brush on top right after baking, before adding the glaze or frosting. Temperature matters. A cold kitchen means longer rises, a warm kitchen means faster ones. Watch the dough, not just the clock. Even sizing. Keep your dough balls roughly the same size so they bake evenly. Storage: Store leftovers covered at room temperature for up to 2 days. Refrigerate if you used the cream cheese frosting. Reheat individual portions in the microwave for 15 to 20 seconds, or in a 300°F oven until warmed through. To freeze, cool completely, freeze without glaze, then defrost, warm, and ice fresh. No sourdough starter? Use the same day yeast version. See the separate yeast recipe card on this post.
The Yeast Recipe
No sourdough starter? You can make this exact treat with instant or active dry yeast and have it done the same day. The flavor, the coating, the shaping, the glaze, and the bake are all the same. The only things that change are the leavener and the timeline.
For the yeast version I have you do three sets of stretch and folds spaced about thirty minutes apart, just like my same day yeast focaccia. Those folds build the gluten strength that the long sourdough fermentation would otherwise develop on its own, and they are what give you those big, soft, airy bubbles. The full method, ingredients, and timing are in the printable card below.
Cinnamon Roll Pull-Apart Focaccia (Yeast Version)
Equipment
- Large bowl
- spatula
- 13 x 9 cake pan
- Parchment paper
- 2 smaller bowls for dipping
Ingredients
For the Sweet Yeast Dough:
- 535 g bread flour 4 1/4 cups
- 435 g warm water about 100 to 110°F (1 3/4 cups plus 2 tablespoons)
- Yeast choose one: 7 g instant yeast (2 1/4 teaspoons) OR 9 g active dry yeast (2 3/4 teaspoons). See the mixing step for the matching method.
- 8 g salt 1 1/2 teaspoons
- 30 g sugar 2 tablespoons plus 1 teaspoon
- 10 g vanilla extract 2 teaspoons
- 14 g butter melted (1 tablespoon)
- 1 to 2 g ground cinnamon 1/4 to 1/2 teaspoon
For the Pan:
- 28 g butter melted (2 tablespoons)
For the Vanilla Butter Dip:
- 85 g butter melted (6 tablespoons)
- 5 g vanilla extract 1 teaspoon
For the Cinnamon Sugar Coating:
- 150 g brown sugar packed (3/4 cup)
- 7 g cornstarch 1 tablespoon
- 12 to 15 g ground cinnamon 1 1/2 to 2 tablespoons
For the Classic Cinnamon Roll Glaze:
- 180 g powdered sugar 1 1/2 cups
- 45 to 60 g milk or cream 3 to 4 tablespoons
- 5 g vanilla extract 1 teaspoon
- Pinch of salt
OR For the Cream Cheese Frosting (Upgraded Option):
- 113 g unsalted butter softened (1/2 cup, 1 stick)
- 113 g full fat cream cheese cold (1/2 cup, 4 oz)
- 425 g powdered sugar sifted (3 1/2 cups)
- 15 g buttermilk powder optional (1 tablespoon)
- 2 to 4 g ground cinnamon 1/2 to 1 teaspoon
- 5 g vanilla extract or paste 1 teaspoon
- 3 g fine sea salt 1/2 teaspoon
Instructions
Make the Sweet Yeast Dough
- Mix the dough. There are two ways to do this depending on which yeast you use. Follow only the method that matches your yeast, then continue with the rest of the recipe.
METHOD A: INSTANT YEAST (no pre proofing needed)
- In a large bowl, whisk together the bread flour, salt, and instant yeast. Add the warm water, sugar, vanilla, melted butter, and cinnamon. Mix until no dry flour remains. The dough will be sticky and shaggy.
METHOD B: ACTIVE DRY YEAST (proof the yeast first)
- In a large bowl, combine the warm water, active dry yeast, and a pinch of the sugar. Let it sit for 5 to 10 minutes until foamy and bubbly. If it does not foam, your yeast is dead, so start over with fresh yeast. Then add the flour, salt, remaining sugar, vanilla, melted butter, and cinnamon. Mix until no dry flour remains. The dough will be sticky and shaggy.
- Rest. Cover the bowl and let the dough rest for 30 minutes at room temperature.
- Stretch and fold, set 1. With wet hands, grab one side of the dough, stretch it up, and fold it over itself. Rotate the bowl 90 degrees and repeat, going all the way around the dough 4 to 6 times total. Cover and rest 30 minutes.
- Stretch and fold, set 2. Repeat the same stretch and fold around the bowl. Cover and rest 30 minutes.
- Stretch and fold, set 3. Repeat the stretch and fold one more time around the bowl. The dough will feel noticeably smoother and stronger.
- Bulk fermentation. Cover and let the dough rise at room temperature until roughly doubled, puffy, and jiggly, about 1 to 2 more hours. Warmer kitchens rise faster, cooler kitchens rise slower, so watch the dough.
Shape, Rise, and Bake
- Prepare your pan. Line a 9×13 inch baking pan with parchment paper. Pour 28 g (2 tablespoons) of melted butter into the bottom and spread it evenly for a golden, caramelized bottom.
- Prepare the vanilla butter. Melt 85 g butter and stir in 5 g vanilla extract. Set aside for dipping.
- Prepare the cinnamon sugar. Mix the brown sugar, cornstarch, and cinnamon in a shallow bowl or plate.
- Shape into balls. Turn the dough out onto a surface lightly sprayed with oil. Divide and shape into about 16 to 20 equal balls. A bench scraper helps you divide evenly.
- Dip and coat. Dip each ball into the vanilla butter, let the excess drip off, then roll generously in the cinnamon sugar. Coat each piece well.
- Arrange in the pan. Place the coated balls in the prepared pan, spacing them slightly apart so they just barely touch. They will expand and connect during the rise.
- Drizzle with butter. Pour any remaining vanilla butter over the arranged balls.
- Second rise. Cover and let rise for about 1 to 2 hours at room temperature, until puffy and grown together into one cohesive pull-apart loaf.
- Bake. Preheat the oven to 375°F (190°C). Dimple the tops of the balls gently with your fingers. Bake for 25 to 30 minutes, until deep golden brown. The internal temperature should reach about 190 to 200°F.
- Cool slightly. Let cool in the pan for 10 to 15 minutes before glazing.
Make the Cinnamon Roll Glaze
- While the focaccia cools, whisk together the powdered sugar, milk or cream (start with 45 g), vanilla extract, and a pinch of salt until smooth. Add more liquid as needed to reach a thick but pourable consistency.
OR Make the Cream Cheese Frosting
- Cream 113 g softened butter on medium high speed for 2 minutes until pale and fluffy. Add 113 g cold cream cheese and beat just until combined. Do not overmix. Mix in the vanilla and fine sea salt. Sift together the powdered sugar, cinnamon, and buttermilk powder if using, then add gradually on low speed, about 1/4 cup at a time, until smooth. Taste and adjust.
- Frost or glaze. Generously spread the frosting or drizzle the glaze over the warm focaccia. Serve warm and pull apart to enjoy.
Notes

Tips for the Best Cinnamon Roll Focaccia
Use active, bubbly starter. For the sourdough version, your starter should have doubled and be at its peak when you mix. This is your rise and your flavor.
Do not skip the rest. That first rest lets the flour fully hydrate and makes the dough far easier to work with. It is worth the wait.
Embrace the sticky dough. High hydration is what creates that soft, fluffy texture. Use wet or oiled hands and resist adding flour.
Watch your proof, not the clock. Under proofed focaccia bakes up dense and tight. Over proofed bakes up flat. Look for the dough to be puffy, jiggly, and slow to spring back when gently pressed.
Room temperature matters. Fermentation is happiest between 68 and 75°F. Cooler kitchens take longer, warmer kitchens move faster.
Do not rush the second rise. The balls need time to puff and grow together into one cohesive pull-apart loaf. They should jiggle when you shake the pan.
Bake on the lower rack. This helps the bottom caramelize and keeps the sugary top from browning too fast.
Cool slightly before glazing. Glaze on bread that is too hot will slide right off. Give it about 10 to 20 minutes.
Serve warm. Pull-apart focaccia is always best the day it is made while it is still warm and the pieces separate easily.

Ingredient Substitutions
Not everyone has the same pantry, and that is okay. Here are some simple swaps that work well.
Butter. Salted or unsalted both work beautifully. If you only have unsalted, add an extra pinch of salt to your melted butter. For a dairy free option, a plant based butter works in both the dough and the vanilla butter dip.
Glaze liquid. The glaze calls for milk or cream, but you do not need to run to the store if you are out. Substitute water plus a small amount of melted butter to keep that rich consistency. Start with 3 tablespoons of water and half a teaspoon of melted butter, then add more liquid as needed until it pours. Plant based milks work perfectly here too.
Flour. This recipe is written for bread flour, which gives you that soft, chewy, pillowy texture. All purpose flour can be used in a pinch, but the texture will be slightly less structured. Add about 20 grams less water if you are using all purpose, since it absorbs differently than bread flour. If you are using fresh milled flour, expect your hydration needs and proofing times to be different. Watch your dough, not the clock.
Gluten free. This recipe has not been tested with gluten free flour. If you give it a try, I would love to hear how it goes in the comments.
Storage and Make Ahead Instructions
Store any leftovers covered at room temperature for up to 2 days. If you used the cream cheese frosting, keep it refrigerated. Reheat individual portions in the microwave for 15 to 20 seconds, or in a 300°F oven until warmed through.
This recipe is built for making ahead, and there are two easy ways to do it.
Option 1, night before. In the evening, mix the dough and let it proof overnight at room temperature. In the morning, shape the balls, dip and arrange them, let them rise 1 to 2 hours, then bake and ice.
Option 2, day before. In the morning, mix the dough and let it proof all day. In the evening, shape the balls, dip and arrange them, cover well, and refrigerate overnight. The next morning, bring the pan to room temperature for 1 to 2 hours, then bake and ice.
Both ways give you the same delicious result. Pick what works for your schedule, and always follow the signs of a complete proof rather than just the timing.
You can also freeze this after baking. Let it cool completely, freeze without the glaze, then defrost at room temperature, warm it in the oven, and add fresh glaze or frosting when you serve. It tastes like you just made it.
Frequently Asked Questions
Can I just use my regular focaccia dough for this?
Yes. If you already have a focaccia dough you love, you can absolutely use it here. Make my sourdough focaccia dough or my same day yeast focaccia dough and follow those instructions right up until it is time to ball them up. Once your dough has finished its bulk fermentation, come back to this recipe and pick up at the shaping step: divide into balls, dunk in vanilla butter, roll in cinnamon sugar, arrange, rise, and bake as directed.
Does this taste like a cinnamon roll?
Yes. The vanilla butter and brown sugar cinnamon coating give you that classic cinnamon roll flavor, with a soft pull-apart interior and a lightly caramelized shell. Readers tell me it tastes like the gooey middle of a cinnamon roll, which is the best part.
Why does the dough only have one stretch and fold in the sourdough version?
Because it is a focaccia dough. Focaccia relies on high hydration and a long, slow fermentation to build structure, so one set of stretch and folds around the bowl is all it needs. The yeast version uses three sets because it ferments quickly and needs the extra folds to build that same strength in less time.
Why is my dough so sticky and wet?
This is a high hydration dough and sticky is normal. Wet or lightly oiled hands are your best friend when shaping. Resist adding more flour, since that changes the final texture. If you want to ease into it, reduce the water slightly on your first bake.
Can I make it ahead and bake the next day?
Absolutely. See the two make ahead options above. You can shape, dip, coat, and arrange the balls, then cover well and refrigerate overnight for up to 12 hours. Pull the pan out in the morning, let it come to room temperature and finish its rise, then bake.
Can I make the icing ahead of time?
Yes. Make the glaze or frosting the night before and store it covered in the fridge. Pull it out before you bake so it warms up for easier spreading. In a rush, spreading it cold over warm focaccia works just fine too.
Can I bake this in a muffin pan?
Yes. Divide your dough into groups of about 3 balls per muffin cup. Keep the oven temperature the same so you still get that caramelized bottom, but start checking earlier since individual portions bake faster than a full pan.
Can I freeze it?
Freezing after baking works great. Cool it completely, freeze without the glaze, then defrost at room temperature, warm it in the oven, and add your glaze or frosting fresh.
Salted or unsalted butter?
Both work. Salted butter gives a slightly better flavor because the salt balances the sweetness. If you only have unsalted, add about an eighth of a teaspoon of salt to your melted butter and stir well.
Why did my sourdough version taste sour?
A sour taste usually points to a starter on the acidic side, or a dough that fermented too long. Use your starter at its bubbly peak and keep an eye on your bulk ferment so it does not go too far.
How do I know when it is done baking?
The top should be deep golden brown, and the internal temperature should read between 190 and 200°F on an instant read thermometer.
Can I serve it at room temperature instead of warm?
Of course. We leave ours out all the time. The only thing to watch is the cream cheese frosting, which needs to be refrigerated.
More Pull-Apart Focaccia Recipes to Love
This is the recipe that helped kick off my whole pull-apart focaccia series. Once you master the method, you can take it in any direction, sweet or savory. Here are more to try:
Sweet versions:
- Jelly Donut Pull-Apart Focaccia
- Caramel Apple Pie Pull-Apart Focaccia
- Gingerbread Pull-Apart Focaccia
- Lemon Blueberry Pull-Apart Focaccia
- Carrot Cake Pull-Apart Focaccia
- Strawberry Shortcake Pull-Apart Focaccia
- S’mores Pull-Apart Focaccia
- Banana Bread Sourdough Focaccia
- Peanut Butter and Jelly Sourdough Focaccia
- Pumpkin Pie Sourdough Focaccia
Savory versions:
Subscribe
Do not miss a recipe. Subscribe to the H3art of the Home newsletter for new sourdough bakes, high protein recipes, and pull-apart focaccia flavors delivered straight to your inbox. If you make this cinnamon roll pull-apart focaccia, come back and leave a star rating and a comment. I read every single one.



Leave a Reply