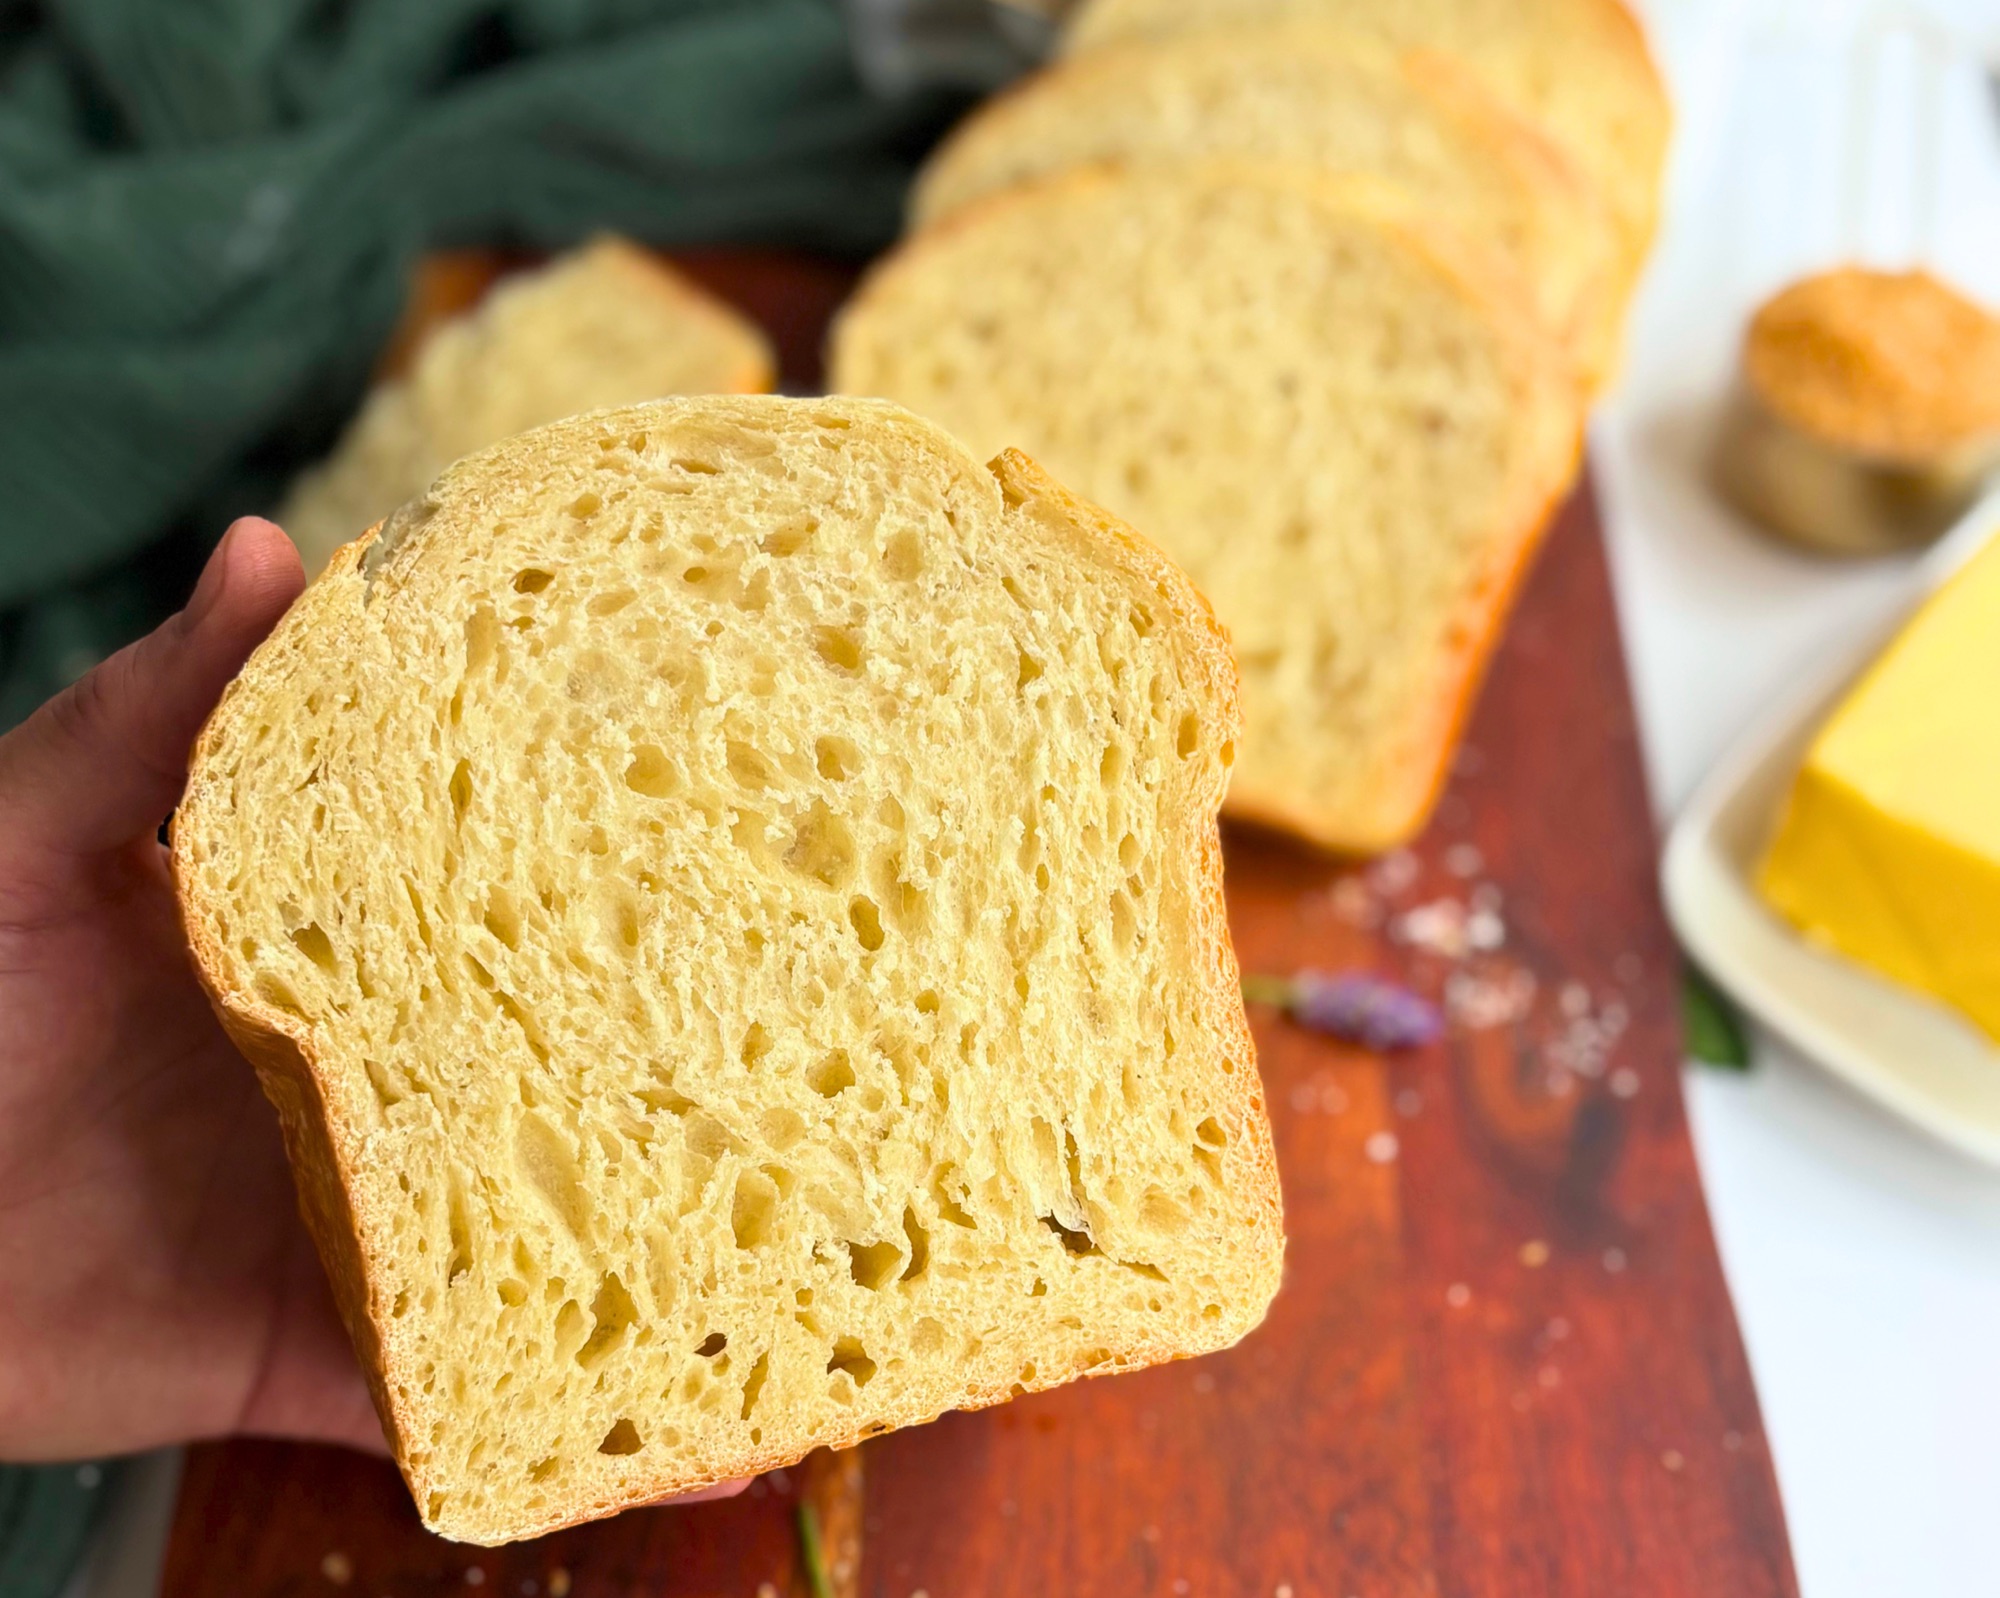
I wanted it all. A sandwich loaf that was golden and stayed soft, without needing to pull out the stand mixer or use a bread pan to proof it. I wanted the same hands off schedule of the sourdough loaf. A quick mix and a few stretch and folds and then let time do the work. A hybrid.
So I created one. My recipe keeps the enrichment but mixes in one bowl, develops through stretch and folds, shapes by hand, cold proofs overnight in a proofing basket, and bakes in a loaf pan using the same double pan method I use for every other sourdough loaf I make.
What comes out is soft enough for peanut butter and jelly and tender enough to eat plain with butter, but with a crumb that still has some character to it rather than the uniform little cells of a store bought loaf. That in between quality is the whole point, and it comes from one decision I will explain below.
Table of Contents
- Why This Loaf Is Different
- The Basket Instead of the Pan
- No Stand Mixer Needed
- What Tangzhong Does
- Ingredient Notes
- Equipment
- How to Shape a Sourdough Sandwich Loaf
- How to Bake It
- How to Get a Soft Crust on Sourdough Bread
- Storage
- Dutch Oven Variation
- Yeast Version
- Troubleshooting
- FAQ
- Recipe
- Shop This Recipe
Why This Loaf Is Different
I run a state certified sourdough micro bakery out of my kitchen, and that context is genuinely why this recipe exists rather than being a nice story I attached to it afterward.
I did not want to buy more loaf pans. Every soft sandwich recipe I could find proofs the dough in the pan, which means a pan is tied up for the entire final rise, and if you want to bake four loaves you need four pans sitting in the fridge or on the counter doing nothing but holding dough. That is a real cost of money, time and a real amount of space.
I did not want to burn out my mixer either. Running enriched dough through a stand mixer for ten minutes at a time, several batches back to back, is hard on the machine and it heats the dough while it works. Warm dough plus butter turns soupy and slack, and then you are fighting it for the rest of the bake.
And I wanted this on the same schedule as everything else I make. Mix, folds, bulk, shape, fridge, bake. One rhythm for the whole kitchen instead of building a separate timeline around loaf pan availability.
Every decision in this recipe comes back to one of those three things, which is also why it happens to be easier for you at home than most of what is out there.

The Basket Instead of the Pan
Here is the single decision that makes this loaf what it is.
Proofing in the pan gives you sandwich bread. Proofing in a basket gives you sourdough. This loaf does one and then the other.
When dough proofs inside a loaf pan, the walls support it as it expands, so it rises to full volume with its structure held in place, and the result is that even uniform crumb you recognize from a bag of store bought bread. That is exactly what a commercial sandwich loaf is supposed to be, and there is nothing wrong with it.
When dough cold proofs in a basket and then gets turned out, it holds its own shape, keeps the cell structure that shaping and fermentation gave it, and carries all of that into the oven where it springs. You get irregular cells, real character, and a crumb that looks like bread somebody actually made.
This recipe takes the second path and then bakes it in a loaf pan, so you end up with a sliceable sandwich shape holding a crumb that sits between the two. The pan is where it bakes, not where it proofs.
The practical benefits are just as good. You already own a proofing basket, you already know how to cold proof in one, and your loaf pan stays free until the moment it goes in the oven. Nobody has to stand there deciding whether the dough has risen a half inch over the rim or a full inch, which is the single most anxious moment in every pan proofed recipe I have ever followed.

No Stand Mixer Needed
The reason enriched doughs usually call for a mixer is fat. Butter coats gluten strands and slows them from linking up, so recipes compensate by beating the dough long enough to force the structure to develop anyway.
There are two ways around that, and this recipe uses both.
The butter goes in melted and whisked into the liquids rather than worked into the dough later and a solid, which distributes it evenly from the very beginning instead of leaving slick patches you then have to knead out. The egg yolk helps here too, since the lecithin in it acts as an emulsifier and pulls the fat into suspension rather than letting it sit on top.
Then time does the rest. Three sets of stretch and folds spaced an hour apart build every bit as much structure as a mixer does, they just do it slowly instead of forcefully, and the dough is resting and fermenting the entire time rather than being heated by friction. This is the same reason no knead bread works at all. Gluten will organize itself if you give it hydration and leave it alone.
For anybody wondering whether stretch and folds count as kneading, they do not. Your hands are in the bowl for roughly thirty seconds at a time, four times, over the course of an afternoon.

That collage is worth studying if you are new to this, because it shows exactly what the folds are doing. The dough goes from a shaggy sticky mass you would swear is broken, to a smooth round ball that holds its shape, without a mixer touching it once.
Take the edge, pull it up, fold it into the middle. Turn the bowl and repeat, about six times around. Fingers on the seam, thumb on the side of the bowl. Flip it over onto itself so the seam goes underneath. Then push away and tuck under at the same time, all the way around, until the ball is taut. That tension is what a mixer would be building for you.
What Tangzhong Does
Tangzhong is a small amount of flour cooked with liquid into a paste before it goes into the dough, and it is the reason this bread is still soft on day three instead of turning into crouton material by day two.
Raw flour can only hold so much water. When you heat flour and liquid together, the starch granules swell and gelatinize, and gelatinized starch holds several times more water than raw flour can. That water stays locked in the crumb through the bake and through the days afterward, which is what keeps the bread soft and slows it from going stale.
The part that matters for this particular recipe is that tangzhong does all of that through starch chemistry rather than through gluten development. It is softness you do not have to knead for, which is exactly what a mixer free recipe needs.
Mine gets made in the microwave in about a minute, and I make it first, before anything else is out on the counter. By the time you have weighed everything else out it has cooled enough to build on, so it costs you no actual waiting. It also gets mixed in the same bowl the dough gets built in, so it does not even cost you a dish.

Ingredient Notes
Full amounts are in the recipe card below. This is the why behind each one.
Bread flour. The higher protein gives you the structure to hold a soft enriched dough upright coming out of a basket. All purpose will work but the loaf will be shorter and softer sided.
Whole milk. Milk fat and milk solids tenderize the crumb, and the lactose gives you that golden color on the crust. It carries about three quarters of the liquid in this recipe.
Water. The rest of the liquid is plain water on purpose. Milk proteins interfere with gluten development and push the crumb toward tight and uniform, so keeping part of the liquid as water is part of how the crumb stays in that hybrid range.
Egg. The yolk is doing the real work here. Lecithin emulsifies the fat and keeps the crumb soft for days, and it adds that yellow color that makes a slice of this look as rich as it tastes.
Butter, melted. Melted rather than softened, whisked into the liquids, so it distributes without any extra step. Fat is what keeps the crust tender rather than firm.
Sugar. It feeds browning, softens the crumb, and holds moisture. It also slows fermentation slightly, which is worth knowing when your bulk runs longer than your plain loaf does.
Active sourdough starter. Bubbly and at peak. It goes in last, after the liquids have cooled the tangzhong down, so it never meets any heat.
Salt. Two percent, which is standard, and it goes in with the flour.
Equipment
You need less than you would think.
A 9×5 loaf pan, and a second one to use as a lid. The double pan method traps steam around the loaf and does the same job a Dutch oven does for a boule. Two identical pans, one inverted over the other. Use a 10×5 pan for a long loaf. Check the shop this recipe section for the exact ones.
A proofing basket. And here is where I will save you some money, because I do not own a long oval banneton either. I use a cotton cover set inside a rectangular plastic storage container. It holds the shape, the cloth takes the flour, and the container keeps everything contained in the fridge overnight. It works exactly as well as the real thing and it stacks better.

The trick that makes it actually work is a big rubber band around the lip of the container, holding the cloth in place. Without it the cloth slides down into the container the second you set dough in it. With it you can pull the cloth tighter on one side and looser on the other to adjust how high or low it sits, which lets you shape the cradle to fit your loaf rather than fighting whatever shape the container happens to be.

Parchment paper. Line the pan rather than buttering it. This dough is stickier than a lean one, and the parchment doubles as a sling so you can lower the cold loaf in without touching it.
A thermometer. Enriched dough is done well before a lean loaf is, and this is the one place where guessing costs you.
How to Shape a Sourdough Sandwich Loaf
There is no single right way to shape this loaf, and I have made it three different ways with three slightly different crumbs. The double Caddy Clasp is the one I keep coming back to, since it gave me the crumb I liked best, and that is the one written into the recipe card. But every dough behaves a little differently depending on your flour, your starter, and how warm your kitchen runs, so the one that gives you the loaf you want may not be the one that does it for me. Here is what each one gives you so you can pick rather than guess.
The batard, which is what I use here
This is the same shape you already put on your everyday sourdough, and that is exactly why I like it for this bread. Nothing new to learn.
Press the rested dough out into a rough rectangle. Fold the top edge down to the center and seal it with the heel of your hand, then roll the dough down toward you, sealing as you go, until you have a log. Pinch the seam closed along the whole length and set it seam side up in your basket.
The one change from a normal batard is the ends. Leave them blunt rather than tapering them into points, since you want the loaf to fill the pan end to end rather than leaving thin corners that overbake.

The hybrid, which is what I used on the yeast version
One fold, seam pinched closed, and then roll it back toward you like you are rolling up a sleeping bag. This one splits the difference. The fold compresses enough to keep the crumb sliceable, and the roll builds tension along the length, so you get height and an even shape without the crumb opening up.

The double Caddy Clasp, for the tightest crumb
This is a technique from Wayne Caddy, and it is worth understanding that it squeezes the dough together rather than folding or rolling it. There is no rectangle and no letter fold anywhere in it.
Turn the dough out and slide both hands underneath it on opposite sides. Lift and fold those two sides up to meet in the middle, pushing and squeezing them together as you go, then pinch the seam closed along the top. Turn the dough and do the same thing to the two opposite ends, folding them up and in with that same squeeze, then pinch those seams shut.
I like to flip it then seam side down and gently pull it toward me to tighten it up. Single means you do that once.
Because you are compressing rather than folding, it pushes out more of the gas the dough is holding, and that gives you the tightest and most even crumb of the three. If you want this loaf to behave as much like store bought sandwich bread as possible, this is the one.

Whichever one you use, pinch your seams properly. That is the step people rush, and a loose seam is how you end up with a loaf that opens somewhere you did not choose.
The general rule across all three is that the more you compress the dough while shaping, the tighter the crumb comes out. Handle it firmly for sandwich slices, handle it gently for a more open sourdough look. Shaping moves the crumb far more than anything in the ingredient list does.
How to Bake It
Exact temperatures and timing are in the recipe card. Here is what is happening and why it is set up this way.
Turn the cold loaf out onto a sheet of parchment, then use the parchment as a sling to lower it into the pan. You never have to handle a cold sticky dough with your hands, and the parchment shields the sides and bottom from direct pan contact, which keeps the edges softer.

The loaf goes into a hot oven under a lid, and the lid is what makes the whole thing work. Under a sealed pan the surface stays humid, and a humid surface does not brown no matter how hot the oven gets. So the covered phase runs hot, which drives oven spring into a loaf that just came out of the fridge, and none of that heat is setting color yet.
The score happens partway through the covered phase, which is the same way I bake my other loaves. This bread does need a score even though a normal sandwich loaf does not, and the reason is the proofing method rather than the shape. A pan proofed loaf has almost no spring left in it by the time it goes in. Yours is coming out of a basket cold with a taut skin and plenty of gas still to release, so it is going to open somewhere, and you would rather choose where. Keep it to a single cut down the center running nearly the full length, and keep it shallow.
Then the oven comes down. Between the sugar and the milk solids, this browns much faster than a lean loaf does, so finishing gentle is what gives you that golden color instead of a dark one.
If you forget to turn the oven down, you have not ruined anything. I have done it, and the loaf came out much darker but just as soft, because temperature controls the color and butter controls the softness. Which brings me to the next part.

How to Get a Soft Crust on Sourdough Bread
Here is the honest answer first. This loaf softens on its own. As it cools, moisture migrates from the crumb outward into the crust, so a crust that feels firm coming out of the oven will be yielding by the time you slice it. Everything below is about helping that along and making it look good, not about rescuing it.
Let the loaf rest for a few minutes, then turn the loaf out onto a rack. Straight out of the oven it is still steaming hard, and butter going on at that exact moment has nowhere to go.
Then brush on a little softened butter. A little. This is the part people overdo, and too much butter sits on the surface instead of soaking in, which leaves you with a greasy crust rather than a soft one and can leave the top looking wet instead of glossy. You want a thin even film across the top and down the sides, and that is all.
If you would rather skip the butter entirely, a light spritz of water works. Mist the loaf all over, just enough to dampen the surface without anything running down the sides, and it gives you a nice shine as it cools.
One thing to be careful about. Do not wrap or bag this loaf until it is completely cool through the center, because a loaf this enriched holds heat longer than a lean one and trapping that moisture gives you a gummy crumb.

What the Crumb Should Look Like
Somewhere between sourdough and sandwich bread, which is the whole reason this recipe exists. The cells are small and even enough to hold a sandwich together, but irregular enough that you can tell a person made it. The color comes from the egg so choose ones that are on pasture if you can.


This is also the bread I would hand somebody who says they do not like sourdough. The milk, butter, sugar, and egg all round the flavor off, and it reads much closer to a rich sandwich bread than to an artisan loaf.
Storage
Once it is fully cool, a plastic bag or a bread box on the counter is all it needs. The tangzhong is doing the heavy lifting here and this loaf stays genuinely soft for days rather than the usual two day window you get with homemade bread.
Skip the refrigerator. Cold temperatures accelerate staling in bread, so the fridge does the opposite of what people expect it to do.
If you know it is not going to get eaten quickly, slice the whole loaf first and freeze it that way. Then you can pull out one or two slices at a time and go, rather than defrosting a whole loaf and racing to finish it. Slices toast beautifully straight from frozen.

Dutch Oven Variation
Plenty of people are going to want to bake this the way they bake their regular sourdough, and you can, as long as you know what changes.
Without pan walls the dough has to hold itself up, and an enriched dough spreads more than a lean one at the same hydration because fat and sugar both slacken it. It will not pancake, but expect a wider flatter boule than your plain loaf gives you. If you want more height, hold back some of the water.
The bigger change is the crust. A Dutch oven exists to produce a crackly artisan crust, which is the exact thing this recipe was built to avoid. Butter and a towel cool will soften it considerably, but it is never going to be a sandwich loaf crust. What you get instead is a rich sourdough boule with a beautifully soft crumb, which is genuinely lovely, just not the same bread.
Drop your temperature from what you would normally use, since the sugar and milk solids brown fast and cast iron browns aggressively. Watch the bottom especially, and put a sheet pan on the rack below if yours runs hot.
Yeast Version
This loaf turned out so well that I went ahead and built a yeast version of it, for anybody who does not keep a starter or does not want to wait two days for bread. Everything that makes this method work carries over exactly, which I think says something about the method itself.
Troubleshooting
The dough feels way too loose after mixing. Do not judge it at the shaggy stage. The tangzhong has not distributed yet and the flour has not finished drinking, and the melted butter makes everything feel slicker than it is. Give it the first rest and one full set of folds before you decide anything, and it will almost always have tightened up on its own. The collage above shows exactly how much changes between the mix and the first fold.
It is still loose after the first fold. Sprinkle a small amount of flour over the surface during the second set, fold it through, and wait twenty minutes before adding any more. An extra set of gentle coil folds will also firm it up, and the cold proof firms it further overnight.
It will not hold its shape coming out of the basket. Shape it and put it straight into the lined pan for the cold proof instead. You lose the basket workflow for that one bake but you keep the loaf, and a pan supported dough still bakes tall and soft under the lid.
The loaf burst along the side instead of at the score. The score was not long enough or deep enough to be the only escape route. Run it nearly the full length of the loaf next time.
The crumb came out more open than I wanted. Press the dough out more firmly before you fold, and keep the fold snug. Compressing the dough during shaping is what releases the gas that would otherwise blow into large cells, and shaping changes the crumb far more than anything in the formula does.
The crust came out dark. You baked the uncovered phase too hot. Butter it anyway, because it will still be soft, and drop the temperature for that last stretch next time.
The crumb seems gummy. It was cut too early. A tangzhong crumb needs to cool completely for the starch to set, and slicing it warm will make a perfectly good loaf look like a failure.

FAQ
Do I really not need a stand mixer?
Correct. There is no kneading anywhere in this recipe. Stretch and folds do all of the structural work, and the melted butter and tangzhong handle the softness that a mixer would otherwise be developing.
Can I make this without a proofing basket?
Yes, and you do not need to buy one. A cotton or linen cloth set inside a rectangular plastic storage container works perfectly and is what I use. Flour the cloth the same way you would flour a basket.
Can I proof it in the loaf pan instead?
You can, and it will still be a very good loaf. It will just be a different one, with the tighter uniform crumb that pan proofing produces. The basket is what gives this bread its character, so I would try it that way first.
Can I use all purpose flour?
Yes, though the loaf will be a little shorter and the sides softer. Bread flour gives you the structure to hold a soft enriched dough upright.
Can I skip the tangzhong?
You can, and the loaf will still work. It will be slightly less soft and it will not keep as well past day two. Given that it takes about a minute in the microwave, I would not skip it.
Why is my bulk taking longer than my regular loaf?
Sugar, fat, and dairy all slow fermentation down. Judge by the rise rather than by the clock, and keep the dough somewhere warm if your kitchen is cool.
How do I know when bulk fermentation is done?
Look for the dough to be up by roughly half to three quarters of its original volume, domed on top, and jiggly when you move the bowl.
Can I make multiple loaves at once?
Yes, and this is exactly where the basket method pays off, since you only need your pans at the moment you bake rather than for the whole final proof.
Can I bake this in a Dutch oven instead of a loaf pan?
Yes, with adjustments. See the variation section above.
Does it taste sour?
No. The milk, butter, sugar, and egg all soften the flavor, and this reads much closer to a rich sandwich bread than to an artisan loaf.
If your loaf does come out sour, that is almost always the starter rather than the recipe. A sour loaf usually means an acidic starter, which happens when it has gone too long between feedings or has not been kept strong. Feed it a few times on a regular schedule and use it at peak, and the next loaf will taste completely different.
How long does it stay soft?
Several days on the counter in a bag, which is the tangzhong doing its job.
Can I make this with yeast instead?
Yes, and I have a full tested version of it. The link is in the yeast version section above.
Recipe

Soft Sourdough Sandwich Bread (No Mixer, No Kneading)
Equipment
- Large microwave safe mixing bowl
- Whisk
- bench scraper
- Oval proofing basket or a linen lined rectangular storage container
- 2 9×5 loaf pans or 10×5 ince pans
- Parchment paper
- Lame or razor blade
- Instant read thermometer
- – Pastry brush
- Wire cooling rack
Ingredients
Tangzhong
- 25 g bread flour 3 tablespoons
- 125 g whole milk 1/2 cup plus 1 teaspoon
Dough
- 125 g whole milk cold (1/2 cup plus 1 teaspoon)
- 75 g water cold (1/3 cup)
- 50 g egg 1 large
- 75 g active sourdough starter 1/3 cup
- 36 g granulated sugar 3 tablespoons
- 30 g butter melted and cooled (2 tablespoons)
- 425 g bread flour 3 1/3 cups plus 1 tablespoon
- 10 g salt 1 3/4 teaspoons
For Finishing
- 14 g butter softened (1 tablespoon) optional
Instructions
- In the microwave, melt your butter.
Make the Tangzhong
- Whisk the 25g of bread flour into the 125g of milk in a large microwave safe bowl until completely smooth with no large lumps sitting on the bottom.
- Microwave in 20 to 30 second bursts, whisking well between each one, until it thickens to the consistency of pudding and the whisk leaves a trail behind it. This usually takes about a minute total.
- Let the tangzhong sit for about 5 minutes while you weigh out the rest of your ingredients.
Mix your Dough
- Whisk the cold milk, cold water, and sugar directly into the warm paste until smooth. This brings the temperature down. Check that it feels no warmer than lukewarm before you go on.
- Whisk in the egg, then the sourdough starter, then the melted butter, until the mixture looks uniform.
- Add the bread flour and salt. Mix with a dough whisk or your hands until no dry flour remains and you have a shaggy mass. It will feel sticky and loose at this stage, which is normal. Use your dough scraper to clean off the sides of the bowl and make the dough into a round in the center of the bowl.
- Cover and rest 1 hour.
- Perform 3 sets of stretch and folds spaced 1 hour apart, covering the bowl between each set. For each set, pull the edge of the dough up and fold it into the middle, turning the bowl as you go until you have worked all the way around about 6 times. Then put your fingers on the seam and your thumb against the side of the bowl, flip the dough over onto itself so the seam sits on the bottom, and push and tuck around the edge a few times until the ball is taut. (see the shaping video on the blog)
- Let the dough bulk ferment at room temperature until it has risen by 50 to 70 percent, is domed on top, and jiggles when you move the bowl. This will take longer than a lean loaf because the sugar, fat, and dairy slow fermentation. Mine took about 7 hours at 72 degrees F.
- Turn the dough out onto a lightly floured counter and pre shape into a round. Rest 15-20 minutes seam side down.
- Turn the dough out onto a lightly floured counter. Slide both hands underneath the dough on opposite sides, then lift and fold those two sides up to meet in the middle, pushing and squeezing them together as you go. Pinch the seam closed along the top.
- Turn the dough and repeat on the two opposite ends, folding them up and in with the same squeeze, then pinch those seams shut. You should have a cylinder the length of your pan with blunt ends rather than tapered points.
- Place the dough seams side down and pull it back toward you, making the top to the dough taunt.
- Place the shaped loaf seam side up into a floured proofing basket. Cover and refrigerate 8 to 14 hours.
Bake your Bread
- Preheat the oven to 450 degrees F
- Line the your pan with parchment. Remove it and turn the cold loaf out onto a sheet of parchment, then use it as a sling to lower the loaf into the pan. Trim any overhang to about an inch.
- Invert the second pan over the top as a lid and bake 10 minutes.
- Remove the lid, mist the top with water and score a single shallow cut down the center of the loaf, running nearly the full length.
- REDUCE THE OVEN to 375F Replace the lid and bake 30 minutes.
- Remove the lid, reduce the oven , and bake 12 to 15 minutes more, until golden and the internal temperature reaches 195F.
- Lift the loaf out of the pan using the parchment sling, peel the parchment away, and set it on a wire rack. Wait a minute or two, then brush the top and sides with a thin film of the softened butter. Use a light hand, since too much butter sits on the surface instead of soaking in.
- Cool completely before slicing. A tangzhong crumb needs to cool fully for the starch to set, and slicing it warm will make it seem gummy.
Notes
Shop This Recipe
These are the tools I actually use for this loaf. I earn a small commission from these links at no cost to you, which helps support the blog.
- 9×5 Loaf pans. You need two identical ones, since the second gets inverted over the first as a lid. This is what replaces a Dutch oven for a pan loaf. If you want a longer loaf use a 10×5 Pan
- Proofing cloth. Mine goes inside a rectangular plastic storage container that I got at a dollar store (10” x 6”, 3.5” high), with a rubber band around the lip.
- Bench scraper. For lifting the bulked dough out of the bowl and guiding it into the basket.
- Lame. For the single shallow score down the center partway through the bake.
- Instant read thermometer. Enriched dough finishes well before a lean loaf does, and this is the one place guessing costs you.
- Pastry brush. For the thin film of butter after the loaf comes out of the pan.
More Sourdough You Will Love
If you like what the double pan method does here, it is the same method behind The Easiest Cinnamon Swirl Sourdough Bread You’ll Ever Make and The Easiest Cheddar Everything Bagel Swirl Sourdough Bread, both of which bake in a loaf pan the same way this one does.
And if you are still working on your starter, or you do not have one yet, start here with How to Create a Sourdough Starter: A Complete Guide to Minimal Waste and Maximum Flavor.


Subscribe
If this loaf earns a spot in your weekly rotation, there is more where it came from. Subscribe and I will send new recipes, the troubleshooting that comes out of my own testing, and the things I only learn by getting it wrong first.



Leave a Reply